Chromatography Test for Malic Acid
updated 01/20/2025
In October I tried something new to me – inoculating with MaloLactic Bacteria (MLB) to induce MaloLactic Fermentation (MLF). The MLB eats harsher malic acid and emits milder lactic acid.
The only way I know for a home winemaker to determine when MLF is complete is to perform an acid chromatography test to determine if any malic acid remains in the wine.
In this post I describe how we conducted the MLF, and later conducted an acid chromatography test to determine if MLF had completed.
Note: This post is NOT a complete primer on MLB and MLF. I provide some background, then describe my actions and my results. Consider this as a starting point for anyone wanting to try MLF.
I watched this video as part of my preparation, and recommend it. He does an excellent job of explaining.
Why MLF?
Malic acid is the dominant acid in apples, which give apples their characteristic tang. In apples, this is pleasant.
However, too much malic acid in a wine gives it an unpleasant bite, which is considered a fault. MLF removes some or all of the malic acid, replacing it with lactic acid, greatly changing the character of the wine. Especially in cold-weather grown grapes, malic acid levels may be higher, contributing to an unpleasant high acidity.
Additionally, MLF tends to create a rounder, fuller mouthfeel. It generally enhances the body and flavor persistence of wine, producing wines of greater palate softness. I’ve read that some winemakers also feel that better integration of fruit and oak character can be achieved if malolactic fermentation occurs during the time the wine is in barrel.
Inoculation
We used Lalvin 31 MLB, primarily because a friend had success with it. In recent years I have been following various MLF threads on WineMakingTalk, and a lot of folks have reported failure in getting MLF started and/or going to completion (removal of all malic acid). Given the expense ($41 USD for enough MLB to treat 66 gallons of wine), we wanted a success on our first try.
Timing of inoculation is open to discussion, and we decided to co-inoculate with yeast, again, because others had success.
Note: MLB is very sensitive to potassium metabisulfite (K-meta), so it should not be added to a wine until MLF is completed.
In October 2023, the Chambourcin, Chelois, and Chardonnel were available at the same time, so we dissolved about 80% of the Lalvin 31 in warm water. These grapes were fermented in five primaries:
- 2 Chambourcin, 150 lbs each
- 2 Chelois, 150 lbs each
- 1 Chardonnel, 125 lbs
So we divided the MLB solution evenly between the five containers.
Two weeks later we pressed the grapes and moved them into glass for initial clearing. At this time the Pinot Noir juice buckets arrived, so we added the red pomace to the buckets. No additional yeast or MLB was added to the Pinot Noir, as the pomace is full of it.
We got the Vidal the next day, and co-inoculated it with the remaining MLB. We pressed the Pinot Noir and Vidal a week later.
Bulk Aging
The plan was to let the Chambourcin and Chelois clear two to three weeks before moving them to barrel. During this time gross lees (fruit solids) should drop, and sediment after that is fine lees (yeast hulls), which is harmless.
However, we grossed a lot more wine than expected, and were out of carboys, so the reds were moved into barrel after a week. Here is where I messed up – I added K-meta to the barrels, which was likely to kill the MLB. Well … it was done, no way to change it, so we plow forward.
There are two extra carboys each of Chambourcin and Chelois extra – these wines did not receive K-meta, as we want the MLF to complete.
Two weeks after pressing the Pinot Noir and Vidal, we racked both, moving the Pinot Noir to a barrel. At this time we added K-meta to both.
We kept putting off doing the chromatography test, and mid-December was crowded, so we decided on mid-January. It doesn’t matter when we do it, as it’s informational only. While that sounds odd, it is correct:
MLF either completed in each wine, or it did not.
The results of the tests will not change anything we do. If the MLF completed? Great!!!!
If MLF did not complete? Oh, well. We’re not going to buy more and re-inoculate.
It will be good to know if MLF completed, and in which wines.
Chromatography Test Prep
Now it’s mid-January 2025 (19th to be exact) and we executed the test. We chose to conduct the test for all wines at once. Each test uses a test sheet and solvent, so to reduce costs we are doing all wines at one time.

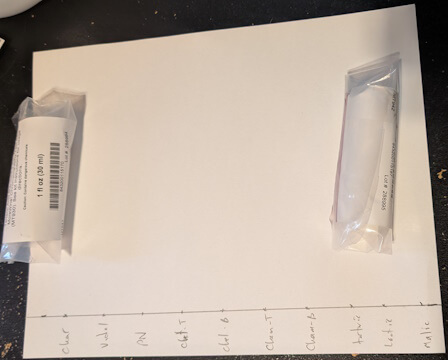
First a test sheet is prepared: using a pencil, draw a line 1″ (2.5 cm) from one of the long edges of a test sheet. It does not matter which side of the paper.
DO NOT use a pen; pencil only. Ink will be affected by the solvent and is likely to mess up the test. Pencil will not.
Then mark points at least 1″ apart on the line. These are the points upon which a drop of material to be tested will be placed on the test sheet.
I started 1/2″ (1.25 cm) from one edge of the short side of the sheet, and marked at 1″ intervals from there. This gives me ten spots, which is a bit crowded, but works fine for home winemaking purposes.
Three of the spots were marked for the test samples. The kit includes bottles of malic, lactic, and tartaric acid. These are used to mark where the spots for those acids stop.
That leaves seven spots for wines. This worked out perfect for our needs in this test, as we have seven samples to test:
- Chambourcin (B – barrel)
- Chambourcin (T – topup)
- Chelois (B – barrel)
- Chelois (T – topup)
- Pinot Noir (barrel)
- Chardonnel
- Vidal
Because we added K-meta early to the Chambourcin and Chelois barrels, the plan is to test the topup carboys as well, to determine if there is a difference.
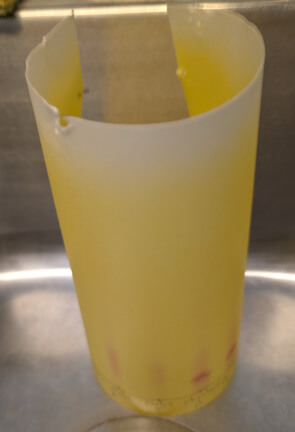
Using pipettes included in the test kit, we placed a drop of substance (acid or wine) on each of the designated spots. Then we stapled the short edges together, so the test sheet forms a cylinder. After pouring 1/2″ of the solvent into the test jar, we dropped the paper in (written side on bottom), and screwed the lid on. This will be ignored until tomorrow morning.
Note: The sheet shown above and the one shown below are NOT the same sheet. I splashed wine across the first test sheet while starting the test, totally messing it. So I created a new one, with the test samples on the right instead of left.
Test Results

The following morning, 21 hours after starting the test, I opened the test jar.
The test paper is yellow. Other than the points where drops of red wine were placed, there are no markings.
Ok … something is not quite right. We started the test correctly, so there’s something I’m obviously missing.
I re-watched the video I mentioned above, fast-forwarding to the part about reading results. I watched the video in November (it’s now January) and managed to forget the sheet has to dry. <face palm!>
Ok. I checked the sheet again 4 hours later and the acid spots were clearly visible. The yellow on the sheet turns green as a it dries, and the spots become very visible.
Eight hours later, the spots were even more visible. Patience is key.

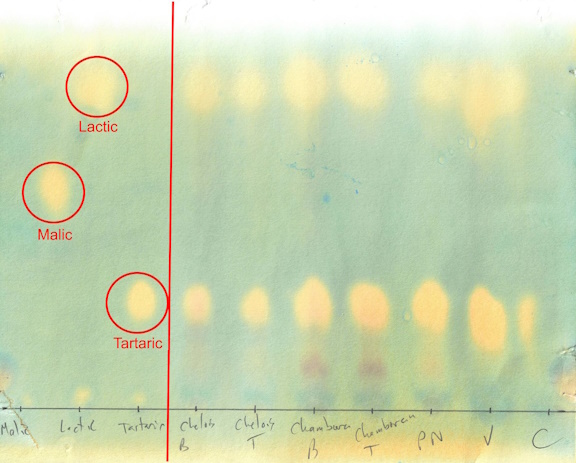
The red circles on the left indicate where the spots occur for the control acids. Lactic moves better through the paper, so it’s at the top. Malic less so, so it’s in the middle. Tartaric moves the least, so it’s at the bottom.
These points are the reference for the test.
All the samples have tartaric acid, so there are intensely colored spots at the bottom of the page, at the same level as the tartaric sample.
All wines also have lactic acid, in lesser quantities than tartaric, so all wines have less intensely colored spots at the top of the sheet.
There are no spots in the middle, which indicates there is no malic acid present.
The MLF completed!
Note: If a wine contains no malic acid, there will be no spots. Commercial wineries may conduct a test prior to fermentation, and use that information to help decide if they want to induce MLF on a wine.
I scanned the test sheet to create the above image. The test sheet will fade within a few days, so either take a picture or scan the sheet to preserve the information.
Conclusion
I’ll do things a bit differently next time.
First – the test samples always produce spots in the same place. There is no need to use up valuable slots to repeat something I already know. So unless there is a specific need, I’ll skip them in future tests. This gives me ten spots for wines instead of seven. Alternately I could space the markings 1-1/4″ apart (3.2 cm) and fit eight on the page. What I do in the future will depend on how many samples I have to test.
Second – leave the test jar sealed for a full 24 hours. The top of the sheet was still white, so the wicking was not 100% complete. In this case it didn’t make any difference, but in the future it might.
Third – use 3 staples (top, middle, and bottom) to connect the edges of the test paper together. Using only top and bottom left it bowed in the middle. The wicking goes straight up (based upon gravity), so some of the spots ended up near each other. If the paper is straight, there won’t be any interference between samples.
Fourth – when the paper comes out of the test jar, ignore it for at least 8 hours. Staring at it fails to make it dry faster.
