
2023 Vidal in Detail
Last updated 06/10/2024
I thought my Metheglin In Detail post would be my last In Detail post for a while, as I didn’t believe I had anything new to say. The intent of these posts is to highlight something that wasn’t highlighted in a previous one.
However, I was thinking about what I’m doing with the Chambourcin and Vidal, and realized I need to do two more.
For the Vidal, this is about winemaking style, as I’m making a traditional white from the juice and also making an “orange” wine from the pulp and remaining juice.
For the Chambourcin, it has its own post.
An “orange” wine is a white wine made like a red, fermented on the skins rather than just from the juice. The wines often have an orange-ish cast due to exposure to the skins during fermentation.
While I work on the Vidal and Chambourcin at the same time, this blog will focus on the Vidal, highlighting the differences between the traditional batch and the orange batch.
Dates of Activity
|
10/07/2023 10/08/2023 10/09/2023 10/10/2023 10/12/2023 10/13/2022 |
10/17/2023 10/20/2023 10/25/2023 10/27/2023 11/10/2023 |
03/09/2024 04/25/2024 06/10/2024 |
10/07/2023
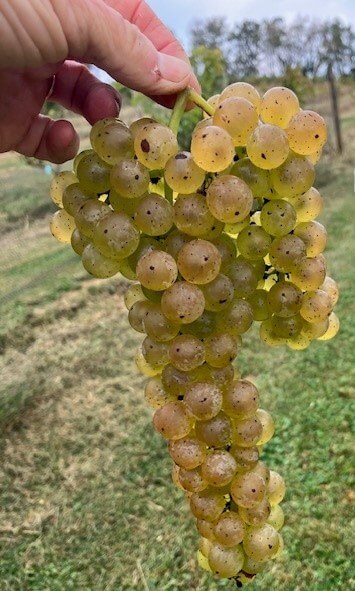
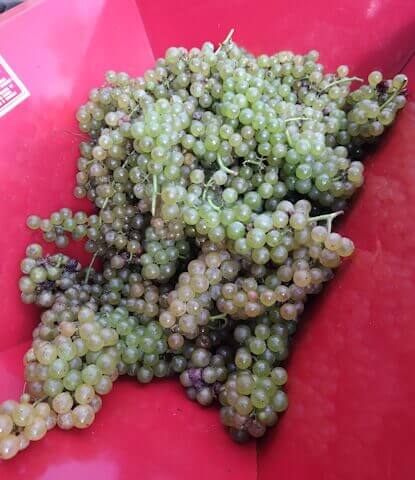
I drove four hours to Highland Meadow Vineyards in Glade Spring VA, which is owned by my friends Beth & David. I purchased 120 pounds each of Vidal and Chambourcin from them, and we crushed my grapes using their crusher. I tried something different this year, as I brought drawstring brewing bags and lined my containers before filling with crushed grapes. This makes taking the grapes out easier.
We crushed my Vidal, then the remainder which they are making wine from. Then we crushed my Chambourcin, then more for them plus Chelois. We celebrated with a small glass of their 2022 Vidal, and then the 4 hour drive home.
At home I made starters with Renaissance TR-313 yeast, adding 1/2 tsp Fermax and 3 Tbsp sugar to 1 cup 92 F water in a wine bottle. These will be used in the morning.
The plan is to segregate 4 gallons of juice, which will be fermented traditionally. This proved VERY easy — lift a bag above the container, letting it drain a bit. The Vidal was in 3 containers, and I got just over 4 gallons of juice doing this.
I added 1/4 tsp Scottzyme Cinn-Free to the juice. Why Cinn-Free? According to Scott Labs:
- Can release varietal aromas and aromatic precursors that are trapped in the pectin matrix
- Increases yield
- Generally results in compact juice lees
- Can improve wine filterability
This won’t change the yield of the juice batch, but the other 3 items are useful.
Note: In this post I refer to Batch #1, the juice, as Juice. Batch #2 is referred to as “Orange”, as it’s an “orange wine”, a white fermented on the skins.
Batch #2 (Orange) is all the pulp plus the remaining juice. To this I added 1/2 tsp Cinn-Free, and all four of the above items should be applicable.
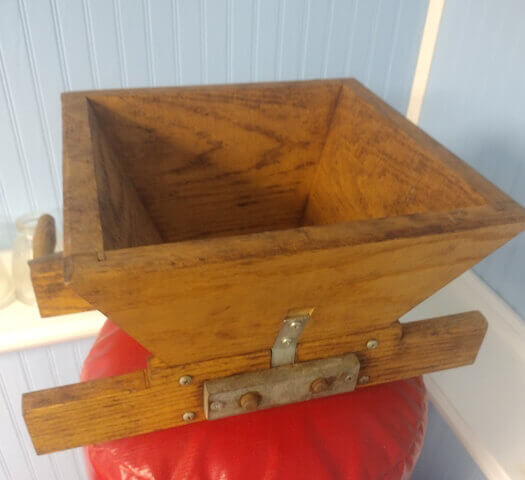
Note: Beth & David’s crush is a hand-crank unit where the hopper can hold probably 30 to 40 lbs of grapes at a time. I have a crusher … but it’s a LOT smaller — the outside measurement is 10.25″ (26 cm). It’s fully functional, but very tedious for crushing hundreds of pounds of grapes.
10/08/2023
Bright-n-early I checked the starters — lot of activity.
I did not bother testing SG or pH yesterday. While I could have checked Juice and got a solid answer, another 12 hours of maceration may change both for Orange.
The brix (SG) was low, so I added 2 cups sugar to each, which popped the SG to where I wanted it.
| Batch | pH | Orig SG | Adj SG |
|---|---|---|---|
| Juice | 3.24 | 1.080 | 1.088 |
| Orange | 3.31 | 1.080 | 1.088 |
The pH and SG values are expected value for cold weather French-American hybrids. They tend to be more acidic and lower brix. Brix is easy to fix — add sugar!
The pH? It’s currently within a reasonable range, and if the wine is sharp after 3 months of bulk aging I’ll address it at that time. In my experience, doing something now is too early.
Note: I expected some difference in the SG due to the overnight soaking of the pulp, and was initially surprised by the difference between the pH values. Which I attribute to the soaking.
Some folks will note that checking the SG of juice is easy, but how do I get enough juice from the pulp to check it?
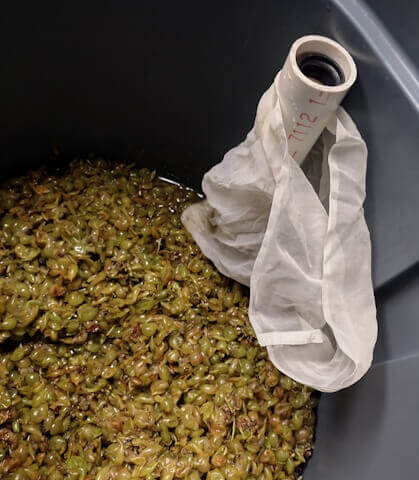
I made a very high-tech jig — a section of PVC pipe with a bunch of 1/4″ holes drilled around one end. I wrap this in a fine mesh straining bag and plunge it into the must. The black piece visible in the picture is a Fermtech wine thief.
One US pound (2.25 cups) sugar will raise the SG of 1 US gallon of water from 1.000 to 1.045. Batch #1 is 4 gallons of juice and I’m expecting to get roughly 4 gallons from Batch #2, so I did the math. The SG for both was 1.080, my target was 1.090, so adding 2 cups of sugar should hit the target.
To each batch I added the sugar, 3 tsp Fermax (yeast nutrient), and 1 tsp grape tannin. Then stirred as best I could. Juice is easy to stir. Stirring the pulp will produce forearms and shoulders that resemble Arnold’s BITD.
Except I didn’t hit the target???
The equations work when we know all the factors. The problem with that in winemaking, is that we don’t always know all the factors. There’s something that threw the calculation off, so the result was close, but not quite on target. What should I do?
DO NOT chase a number!
I was thinking 1.090 and got 1.088. Close enough. There will be no practical difference in the final wine, so as far as I’m concerned, I achieved my goal.
All adjustments made, it’s time to inoculate. For Juice, I swirled the starter to mix and then carefully poured the starter along an edge to make it spread as little as possible. For Orange, I made a hole in the pulp and poured the starter into it.
Oh, regarding the tannin? It adds structure and body to the wine, and any excess should precipitate post-fermentation.
10/09/2023
Fermentation is well underway this morning. I could smell it when I opened the cellar door.
Juice is “buzzing” — no foam, but tiny bubbles are breaking the surface. I did a quick check and the SG has dropped a few points, which is the real indication of fermentation. Smell is a great indicator and as is a tight cap (for ferments with solids), but SG is the trustworthy indicator.
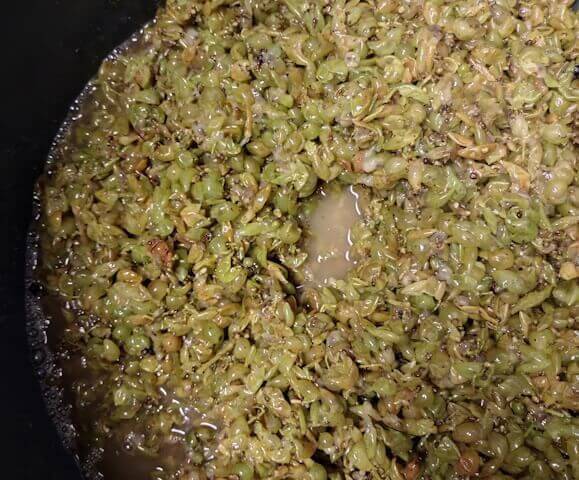
Orange displays a great visual indicator — the cap (fruit solids) is floating high. This is from the CO2 released by the yeast during fermentation.
The cap should be punched down at least once a day. This avoids it drying out and providing a surface where mold can grow.
I punch the cap down three to four times each day, typically first thing in the morning and in the evening before bed. Plus once or twice during the day (typically right after work).
In addition to preventing unwanted microbial life, the pulp and skins contain sugar and other extractable substances, so ensuring all parts are in contact with the liquid helps ensure that fermentation extracts everything it can.
How do I punch down? I have a couple of stainless steel paddles (long and short handles) and basically go around, pushing the cap down and breaking it up.
Some use a sanitized 2×4 board, and I’ve seen a hand-made tool — a piece of 4″ PVC pipe that has four 6″ slots cut into one end, and it was heated and the plastic bent, to form a sort of star. I need to make one of them.
I was concerned at how thick this must would be, as I removed about half the juice. However, it’s not hard to punch down. The Chambourcin is really juicy and I’m stirring more than punching down, but this one is easy.
10/10/2023
I checked the SG this morning — both wines are at 1.032. That’s fast!
Added 1 tsp Fermax to each. While I’m not sure it’s necessary at this point, IMO it doesn’t hurt. Although Renaissance yeast do not produce H2S, if the yeast has proper nutrition the ferment will finish cleaner.
I’m considering racking the juice tomorrow, and pressing the grapes, moving both under airlock. Once fermentation is complete, I will add bentonite to each to eliminate any possible protein haze and to clear them faster. The plan is to rack off the gross lees 1 week later, then fill a 12 liter carboy with Juice and add any remainder to Orange.
Afternoon Update
My son is available today and Thursday to press, not tomorrow night, so we decided to do it today.
I racked the Juice batch — SG dropped to 1.020 at 3:30 PM, so I made the right decision. When I racked an hour later, it was at 1.018. I put the ~4 gallons in a 19 liter carboy under airlock, where I expect the ferment should be completed in 2 to 3 days. When the wine starts to clear, I’ll know the ferment is complete.
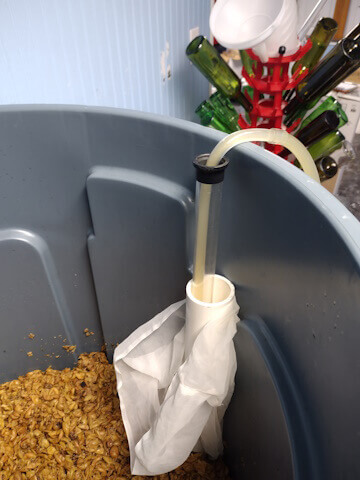
We used my PVC jig to rack the Orange wine out from under the cap, grossing another 4 gallons. This went into another 19 liter carboy under airlock.
Note: the jig was easy to make (drill holes in PVC pipe) and I wrap it in a fine mesh bag, that keeps out all but the finest particles. This prevents clogging the racking tube by coarsely filtering the wine. The only drawback is cleaning the bag afterward can be a pain.
I was a bit surprised, as the SG was 1.011. Things have been in lockstep between the two batches so I didn’t expect much difference. But my surprise was momentary, as every batch is different, and even though these grapes are from the same row in the same vineyard, every single bunch of grapes may be different from the ones next to it. Actually, every grape is different.
The question is how much wine will we get from pressing the pomace? My expectation was another couple of gallons.
Note: I learned to rack the wine from beneath the cap to save labor. We have to carry the fermenter out the cellar door, around the house (up hill) to the driveway where we press. By racking first, we reduce the effort, in this case by ~32 lbs (weight of 4 gallons) of wine we don’t carry up to the front yard, and later carry back. Plus pouring wine into the press is just more work, as there’s no need.
The cake compresses a lot with the wine gone. We grossed another 4 gallons of wine! This surprised me as we got double what I expected.
The big surprise was the SG — 1.005. I have no idea why the wine in the pomace had a lower SG than the free run. I’ve been punching down 4 times per day, so it’s well mixed.
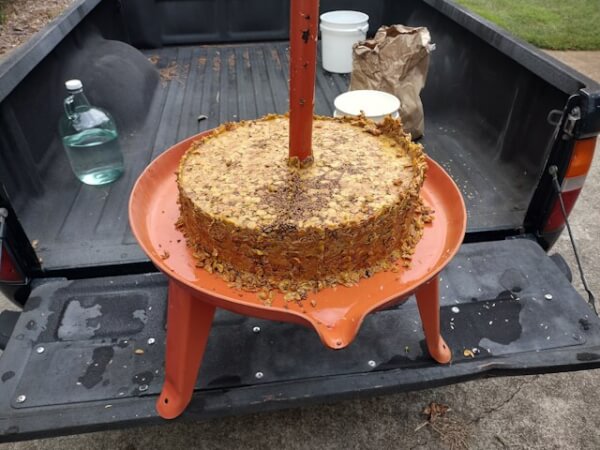
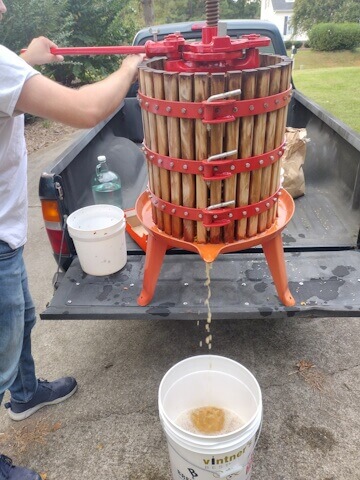
We used rice hulls again — we poured about 6″ of pomace into the press, then Eric added a double-handful of rice hulls, more-or-less evenly distributed. Then we added another 6″ of pomace, and another double-handful. Finally we poured the remainder of the pomace on top.
A fair amount of wine runs out of the press without pressure, in this case about a gallon. Then we placed the pressing blocks on top, and the weight of them pushes out more. Finally we put the ratchet on top and start cranking.
When we decided it was pretty much done, the ratchet comes off (it’s iron, heavier-than-heck), then the blocks. Then we take the cage off.
The cake was very dry — we’d not have got much more from it, maybe a few ounces.
I noticed that the cake was in layers, separated by the rice hulls, as can be seen in this picture:

Then comes the un-fun part — cleaning up. We had to pressure wash everything. Yeah, I had fun with the pressure washer:
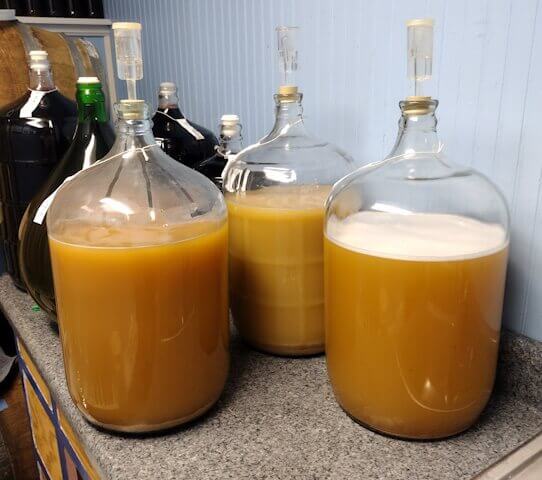
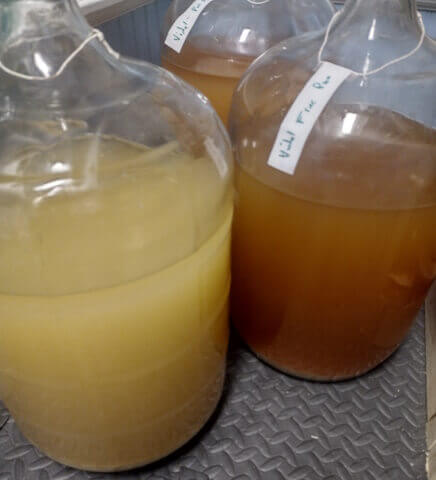
The final result is three 19 liter carboys, each with about 4 gallons of wine. The one in the back is Juice, the one on the right is Orange-Free Run, and the one on the left is Orange-Pressing.
As mentioned previously, they should complete fermentation in a few days. The fermentation keeps particles in suspension, so once the wines start to clear, it is a good indication that fermentation is complete. At that point I’ll check SG, then add bentonite to each. A week or two later I’ll rack. Juice will go into a 12 liter carboy, while I’ll homogenize the two Orange batches, and most will go into a 23 liter carboy and the remainder will go into whatever containers it fits in. At this time I wish I had another 25 liter demijohn (the one behind the Pressing contains Metheglin), but I will make do with what I have.
10/12/2023
I checked SG tonight, as I’m planning to add bentonite over the weekend, and need to see if fermentation is complete.
It’s not. Close, but no cigar.
| Batch | SG |
|---|---|
| Juice | 1.000 |
| Orange – Free Run | 1.003 |
| Orange – Pressings | 0.999 |
It will probably take three to five days for the ferments to complete. At this point I’m not concerned, as all three are under airlock and with active fermentation, the headspace is of no concern. I’d like to get the bentonite in, just to get it done, but Mother Nature and Dionysus do things in their own time.
One interesting thing is the color — the Juice is definitely the lightest. Next is the Orange Free Run, then the Orange Pressings. And the Orange wines have an orange cast … which is expected.
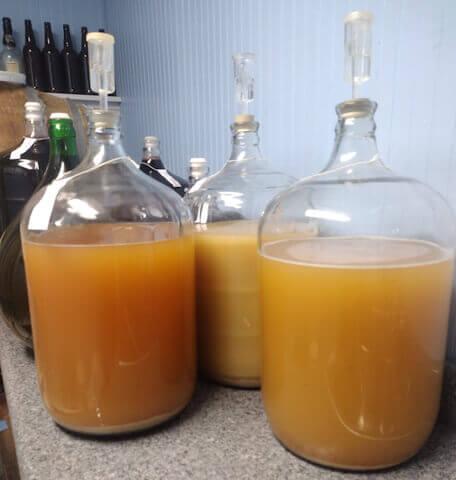
I’m not surprised at the colors, as Juice should be the lightest, especially when it clears. The Pressings being the darkest makes perfect sense, as we cranked 99% of the juice from the pomace.
I’m considering reserving 1.5 liters (2 bottles) of the Free Run and Pressings. My plan is to clear with the wines with Bentonite, then fill a 12 liter carboy with Juice. Any remaining Juice will be blended with the Free Run and Pressings. Having reserved bottles of Free Run and Pressings is just more points of comparison.
Note: If I repeat myself on things, consider YOU are reading this in one sitting. I’m writing it over a matter of days and weeks, with a lot of things in motion, including other batches of wine. I’ll probably go back and edit later on … but that’s not a big concern at this point.
10/17/2023
The wines are showing evidence of clearing, so I decided to add bentonite to remove any possible protein haze and to speed clearing. At this time I’m not concerned with clearing, but the bentonite does double duty, so I’m using it.
I did not bother checking SG.
Normally with kits that include bentonite, I add hot tap water to the fermenter, stir in the bentonite for a minute or so, then proceed with reconstituting a kit. A fair amount of the bentonite doesn’t dissolve, but I haven’t worried about it.
This time I did something different — I read about reconstituting bentonite and used a different approach.
Like many things in winemaking, reconstituting bentonite is a divisive subject with lots of conflicting advice. Sometimes an article conflicts with itself!
There seemed to be a general agreement that 2 tsp bentonite in 1/2 cup water is the right mixture. How long to let it set? Anything from 1 hour to 48 hours. I read through a lot of advice, and decided on 4 hours.
Then? Ok, y’all knew it wasn’t going to be easy. How much of the slurry to add? Some sources said to add the full amount to 19 to 23 liters of wine. Others said to add 1 Tbsp or 2 Tbsp (which are no where near close to the full amount).
ALWAYS think things through and keep “why” strongly in mind. I re-read the sources, considered the situation, and decided that with 12 gallons of wine, using the full batch was fine. This was 4 Tbsp slurry to each of the 3 carboys, along with a scant 1/4 tsp K-meta to each. Then I stirred well with a drill-mounted stirring rod, sweeping up the sediment.
Always pay attention to why people advise the things they do. “Why” is far more important than any other question.
10/20/2023
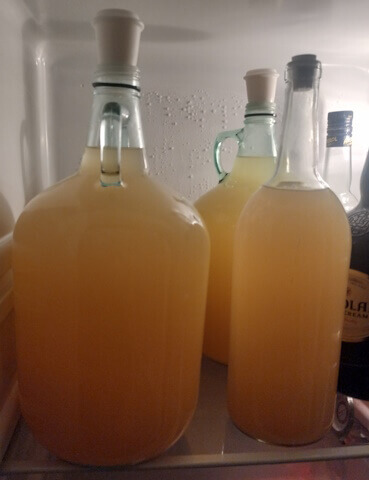
Today I racked the Vidal Juice, moving it into three 4 liter jugs and one 1.5 liter wine bottle. These went into our small fridge for a cold stabilization experiment.
The wine is still very tart — the pH measured at 3.45, although I did not calibrate the pH meter, so I’m unsure if the value is correct. The plan is to leave the wine in the fridge for 2 weeks, then rack into a 3 gallon carboy. At that time I will calibrate the meter and check pH again.
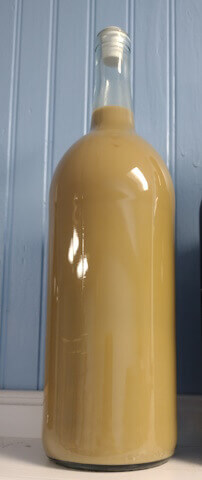
The color differences between the Juice and Orange wines is tremendous.
The bentonite also did a good job, as shown by the amount of sediment precipitated.

As mentioned, the wine will sit in the fridge for 2 weeks, which will hopefully precipitate tartaric acid in the form of tartrate crystals. This will further clear the wine, as a side effect.
10/25/2023
While it’s not a serious problem while the wine is degassing, the carboys have a lot of headspace, and I decided to address it. One week after adding the bentonite I racked the Orange Free Run and Orange Pressing.
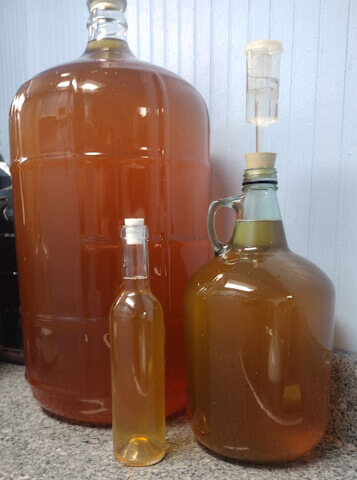
The Free Run SG is 0.997 and the Pressing SG is 0.999, and after combining, the final SG is 0.998. It’s a bit higher than I expected, but not a problem I have filled a 23 liter carboy, 4 liter jug, and 375 ml bottle with wine.
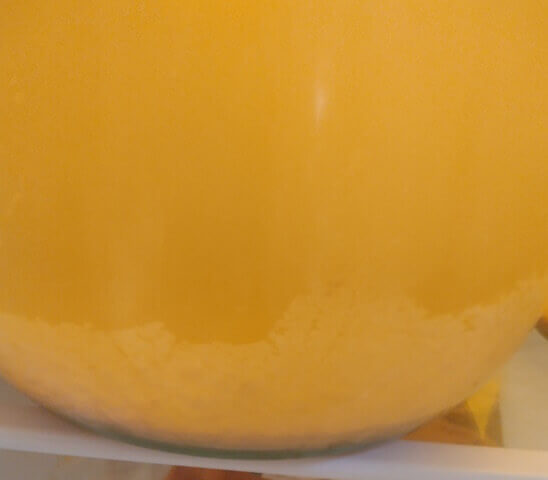
As the picture shows, the wine is definitely orange!
Note that this is NOT oxidation — it’s an orange color from fermenting on the skins. The wine has a fruity aroma, definitely Vidal!
However, it’s still acidic with a grapefruit taste. This is much reduced from what it was, and there were tartrate crystals in the sediment, so I expect the TA will be lower and the pH higher.
It may not be obvious from the photo, but the color is lighter in smaller quantities. The wine in the 375 ml bottle is definitely lighter looking than the 4 liter jug and the 23 liter carboy.
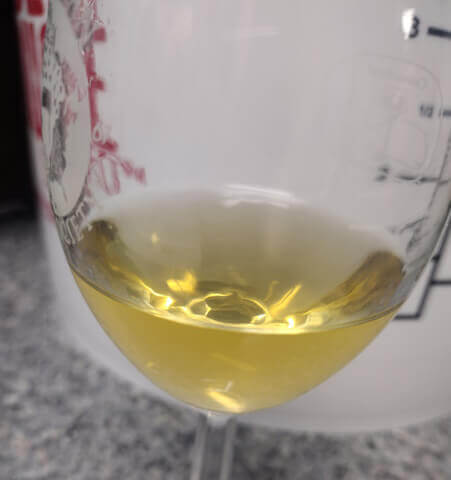
The following photo is this same wine in a glass. The appearance in larger quantities is strikingly different.
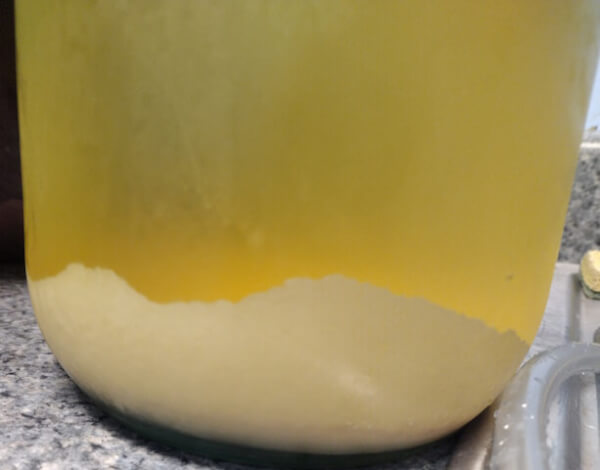
I poured the last of the wine/loose sludge from both fermenters, filling a 1.5 liter bottle.
This will go into the fridge, and I expect to net about 1/3 (500 ml) when it separates and I pour off the clear wine. I’ll post another photo at that time.
The amount recovered varies a LOT. I’ve had bottles that looked like this, and when the lees settled, all but about 2″ in the bottom was clear.
I’ve also had situations were the clear wine was only 1″ on top. But most of the time it’s around half a bottle.
Is this worth the effort?
In my opinion, obviously so! I see no reason to toss out perfectly good wine!
Folks have asked if setting on the lees like this for a week or so hurts the wine. In my experience, it does not. The wine is chilled to under 40 F (4.5 C), which slows most reactions down a lot. Typically one week in the fridge is time enough to settle the lees.
Note that things drop faster at lower temperatures, as the energy of the wine is reduced. This is essentially cold stabilization, so excess tartaric acid may drop in the form of tartrate crystals.
10/27/2023
The sludge bottle in the fridge cleared a few inches at the top in the first four hours in the fridge. This can happen amazingly fast.
Two days later, almost half the bottle is clear. I was hoping for 500 ml (1/3 bottle), but am not complaining if I can recover 750 ml (1 full bottle) of wine. This is far better than tossing it out!
My current plan is to let it settle another week. I’m not expecting to gain anything more, but ya never know!
After this I have 2 bottles of sludge — one from the 2022 Rhone Blend, and one from the 2023 Chambourcin.
With the Rhone Blend, I failed to rack cleanly because the wine is so dark I couldn’t see the end of the cane. Once I realized I was sucking up sediment, I stopped racking. I have two 4 liter jugs that are cloudy plus a bottle. These will go in the fridge to clear in the near future.
The Chambourcin is young, so I don’t rack as carefully, to avoid wasting wine. This bottle will go in the fridge as well.
I took a look at the Vidal Juice jugs in the fridge. Each is clearly dropping tartrate crystals, which are visible on the bottom of the jugs:
However, the wine is not clearing at all — it’s still translucent. I added bentonite, which clears protein haze, so I’m wondering if there is a pectin haze. This is not common in grape wines, but it does happen.
My package of pectic enzyme says the dosage is 1/2 tsp per 1 US gallon. Post-fermentation the effect is reduced by alcohol, so doubling the dose is recommended. I added 1 tsp to the jug in front as a test. We’ll see what it looks like in a week, and if it clears, then we know the problem and its solution. If not? I’ll exercise patience and concern myself with it in a few months.
11/10/2023
I racked the Vidal Juice today, as it’s been in the fridge three weeks and I will probably need the jugs. The plan is to rack all three jugs, plus the two 1.5 liter bottles, transferring the wine to a 12 liter carboy. I should have plenty of wine to fill it, plus some left over. At this time I do not anticipate racking again before bottling, so having top up wine should not be a problem.
Oddly enough, I completely forgot I added pectic enzyme to one of the jugs, but noted that one had a lot more sediment and crystals than the others.
I calibrated the pH meter and checked — 3.20. This is odd, as the original pH was 3.24 and the acid level is definitely reduced, meaning the Titratable Acid (TA) is lower. I don’t check TA (I suck at acid titration in wine) but the taste buds tell me it’s lower.
For those that don’t remember high school chemistry, the more acidic the solution, the lower pH is likely to be. Most of the time pH and TA move in opposite directions, meaning higher TA typically means lower pH. However, because they measure different things (pH is ionization, TA is acid quantity), they don’t always correspond. In this case, they certainly don’t.
Checking pH at this point is primarily curiosity. Adjustments prior to bottling are done by taste — the pH meter will not drink the wine so it’s opinion is not necessarily of value to me.
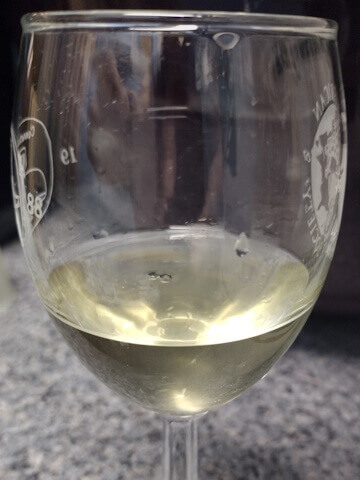
In any case, the wine is very clear in the glass, a nice color.
When my son arrives (we’re bottling barrels this morning) I have a taste test for him: I poured two 2 oz glasses of the Vidal Juice and added 1/4 tsp sugar to one of them. It makes a huge difference with regard to perceived acid.
I will record his reactions.
EDIT: my son liked the backsweetened one MUCH better. We’ll taste test at bottling time.
We both prefer dry wines, typically red, so this indicates the relatively high acid level of the Vidal.
03/09/2024
We bottled the Vidal-Juice today. It’s a light white wine, and with the cold stabilization, it’s crystal clear. I’ve had some whites fizzle within 18 months in recent years, so I’m planning to use this one up sooner than later.
We had a 12 liter carboy plus a couple of smaller containers, so we racked each separately, then combined after tasting each. The smaller containers had not be cold stabilized, and they were sharper tasting. The carboy was just a bit sharp. The cold stabilization made a significant difference.
We typically add 1/2 to 1 oz glycerin per gallon, but after conversing with others on WMT, we decided to try 1-1/2 oz per gallon; actually 5 oz. We added that and 1/4 tsp K-meta, and stirred the heck out of the wine. Glycerin doesn’t blend easily.
That addressed the acid without needing to backsweeten. We bottled 16 bottles + 2 splits. I didn’t think we had enough wine for a 17th bottle, so we put the remainder in a split (375 ml bottle). The remainder after that fit another split, so obviously I estimated wrong!
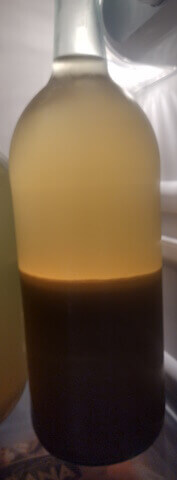
Next on the list is cold stabilizing the Vidal-Orange. We racked the 23 liter carboy into three 4 liter jugs and one 12 liter carboy. The jugs went into the fridge for 3 weeks.
At the end of that time, we’ll swap the jug and carboy, and cold stabilize the remainder. After 3 weeks we’ll combine the wines, and decide on what to do. Ideally glycerin will address the acid so we won’t need to backsweeten.
The cellar is typically 58 to 60 F in the winter. This one was a bit warmer, but the Vidal-Orange still dropped a lot of acid on its own. The 23 liter carboy showed a significant layer. The picture is blurry, but there is a solid layer:
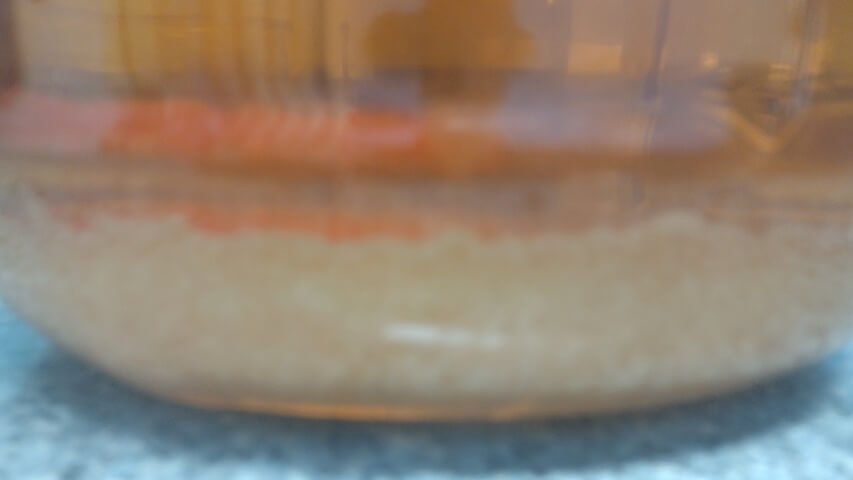
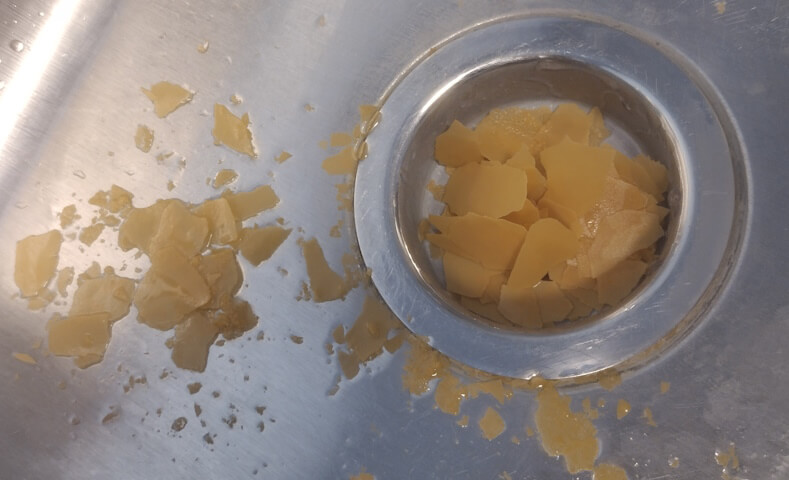
When rinsing the carboy I dumped it into the sink, and the amount of crystals is surprising.
04/25/2024
After 6 weeks in the fridge, we racked the three 4 liter jugs undergoing cold stabilization. Oddly enough, no acid dropped.
The wine has an acidic bite so we added 6 oz glycerin (2 oz/4 liters), which didn’t blunt the acid enough. So we added another 3 oz (9 oz total), which still didn’t do enough.
We made the decision to backsweeten, and added 1/4 tsp K-meta and 1 tsp sorbate. Initially we tried 1/2 cup sugar in 12 liters, and it wasn’t quite enough, so we added 1/4 cup more.
This produced 15 bottles.
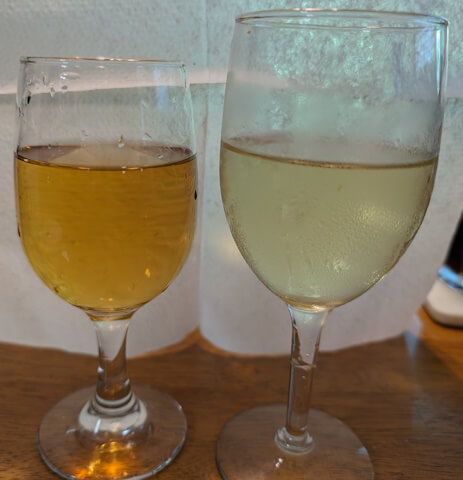
Note that the difference between the Juice and the Orange wines are distinctive.
06/10/2024
I finally got around to bottling the last of the Vidal-Orange. The 12 liter carboy has been calling my name, and today I answered.
I refer to the first Vidal-Orange that was bottled as “Vidal-Orange (part 1)” and this one is “Vidal-Orange (part 2)”.
While racking the carboy I reviewed the 4 liter jugs of various wines, checking airlocks. Airlocks should be checked weekly. I prefer to use vented bungs for bulk aging, but they should be checked weekly as well.
While doing so, I realized I also have a 4 liter jug of Vidal-Orange! This means another 5 bottles or so I was not expecting, which is perfectly fine!
When moving the 4 liter jug I stirred up the sediment a bit, so I left about 20% in the jug. There’s no point in muddying all of the wine because of a few bottle’s worth.
Based upon the last 2 bottlings of Vidal, I decided to go with 1.5 oz of glycerin per 4 liters (roughly), so I added 6 oz during the racking, along with 1-1/4 tsp sorbate and 1/4 tsp K-meta.
Note: My package of sorbate says to use 1/3 tsp per 1 US gallon, so I went just light on that amount (1-1/4 tsp instead of 1-1/3 tsp).
Since I used 1/4 cup sugar per 4 liters for backsweetening with the last batch, I added 1 cup sugar to this one, stirring it in well.
This situation illustrates the potential differences between containers of the same wine. Based upon Vidal-Orange (part 1), one cup of sugar should have been right. However, the wine is just a bit sharp, so I added 1/4 cup more. After a good stirring, it was just right!
Why the difference? It’s likely that Vidal-Orange (part 2) simply didn’t drop as much tartaric acid as did Vidal-Juice and Vidal-Orange (part 1).
This also illustrates why I recommend making additions is small doses, as a small amount of something like sugar (1/4 cup in 16 liters) may be sufficient.
I netted 18 bottles of wine, which I bottled in clear bottles.
Then I looked at my remaining wine in the carboy and jug, and have a lot there. Due to the amount of sediment, I poured the wine through coffee filters (which can plug up quickly) and netted another 2 bottles.
These bottles didn’t receive glycerin or K-meta, nor were they back sweetened. These will be used first, and for drinking I will add a bit of Agave nectar in the glass before filling it.