2024 Wines in Detail
updated 10/04/2025
I changed my mind regarding the “In Detail” posts. This post details events of the 2024 winemaking season, but without intending to explain the details of any specific thing in winemaking. It just documents events as I see fit to post them, a flow of consciousness.
Will this interest anyone other than myself? I don’t know and I can’t say that I care. What it does is help ME remember events and dates, and gives me a place to post pictures.
Dates of Activity
Regular Notes
My normal notes for each batch are here:
| 2024 Chardonnel | 2024 Chambourcin | 2024 Pinot Noir |
10/05/2024
For us, the 2024 grape season officially started today. We are purchasing Chambourcin, Chelois, and Chardonnel.
My son & I left the house at 6AM, driving 230 miles to Glade Spring, VA. Our vehicle was loaded with 4 cases of empty bottles (saved for the vineyard owners), along with almost all the containers we own.
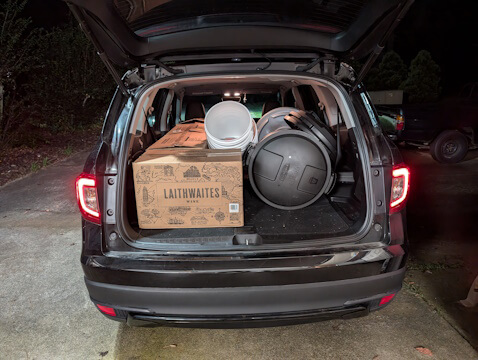
We arrived at Highland Meadow Vineyards just before 10 AM. Once there we crushed 300 lbs of Chambourcin, 300 lbs of Chelois, and 125 lbs of Chardonnel.
The Chardonnel was frozen a few weeks ago, and started defrosting Thursday.
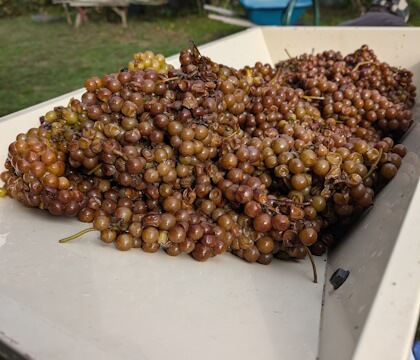
This year the crusher is motorized, which is much easier than hand cranking, especially for 725 lbs of grapes. My back and shoulders are thankful for the change!
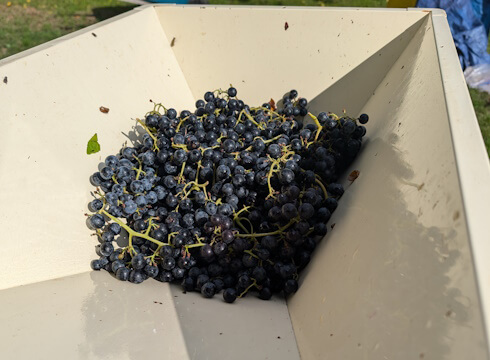
The Chelois look great!
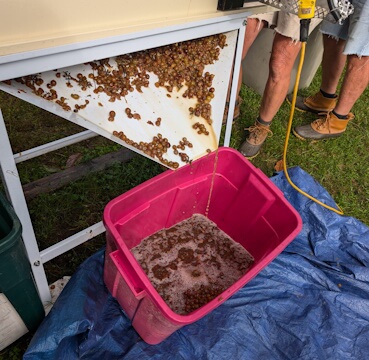
The yellow jackets were not fun! The sugar attracts bees, and the more we crushed, the more the bees arrived. I got stung once on the leg. This wasn’t fun, but could have been worse.
We were planning to purchase 150 lbs of Vidal, but it wasn’t ripe yet. This actually worked out, as we didn’t have enough room. Fully loaded we had:
- three 8 gallon buckets of Chardonnel
- two 6 gallon buckets of red
- three 20 gallon Rubbermaid Brutes about half full of red
- one 32 gallon Brute about one-third full of red
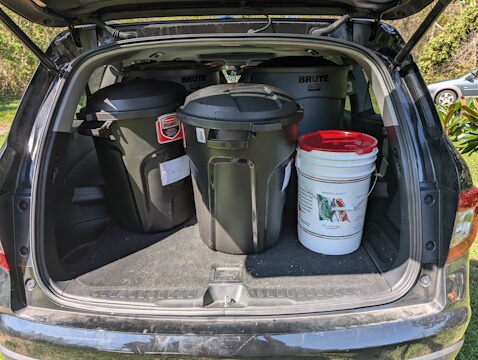
The drive home was pleasant, if a bit long. Once there we unloaded the grapes and moved them into the cellar. The containers the grapes were in are for travel purposes. We needed them light enough for us to easily move them.
Once home we divided them up so the Chambourcin is in two 32 gallon Brutes, the Chelois was in the same, and the Chardonnel was in two 20 gallon Brutes.
I was supposed to make yeast starters, but was out of energy. That will happen in the morning.
10/06/2024
At 7AM I made 6 yeast starters, one for each container. The plan is to ferment each grape in 2 batches with different yeast strains. Post-fermentation each varietal will be blended into a single batch, so we’ll have 3 different batches at that time.
For the Chardonnel, we are using Lalvin QA 23 and Lalvin 71B.
For the Chambourcin, we are using Renaissance Avante and Bravo.
For the Chelois, we are using Renaissance Avante and Bravo.
I use this method for making starters, using 4 tsp yeast for each starter, as I anticipate about 9 gallons from each batch.
In addition to producing a larger initial colony, the starter proves the yeast is viable. Folks will sprinkle yeast on top of a must and wait up to 3 days for it to take off. My starters typically take 10 to 30 minutes for the yeast to start reproducing.
My preference is to use clean and sanitized bottles from which I have not soaked the labels off yet – I write on the label with a Sharpie to mark which is which.
In this case, the Bravo (bottle marked with a “B”) proved to be VERY viable!!!
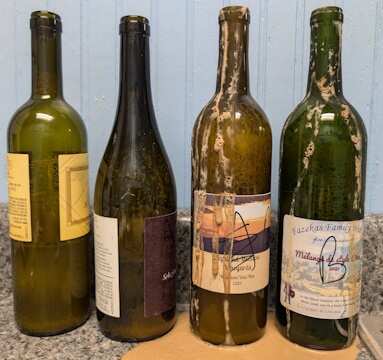
At 6 PM I inoculated each batch.
10/07/2024
Following are details for each batch.
Chardonnel:
125 lbs Chardonnel
2 ml Cinn Free maceration enzyme, divided
Lalvin QA23 and Lalvin 71B yeast
2 lbs sugar, divided
6 tsp Fermax, divided
SG chaptalized to 1.090
Chambourcin:
300 lbs Chambourcin
12 ml ScottZyme Color Pro maceration enzyme, divided
Renaissance Avante and Renaissance Bravo yeast
6 lbs sugar, divided
12 tsp Fermax, divided
SG chaptalized to 1.094
Chelois:
300 lbs Chambourcin
12 ml ScottZyme Color Pro maceration enzyme, divided
Renaissance Avante and Renaissance Bravo yeast
5 lbs sugar, divided
12 tsp Fermax, divided
SG chaptalized to 1.097
Evening Update:
In the evening I planned the first punch down, and inoculated with the Lalvin 31 MLB at that time.
The problem? the packet is designed for 66 gallons of wine, but it’s a tiny amount of material. However, since it’s best to rehydrate first, I reserved a small amount for when the Vidal arrives, and dissolve the remainder in water, which I let set for 5 minutes. The package says to rehydrate for no more than 10 minutes.
Then I added 1 part to each Chardonnel batch, and 2 parts to each Chambourcin and Chelois batch.
As I prepared to do the punch down, I realized I had not yet added fermentation oak! Worse, I discovered I had less than a pound remaining!
So I added 1 cup to each Chambourcin and 2 cups to each Chelois. Then ordered more, which arrives Thursday. We are planning a 1 week EM (Extended Maceration) so the oak will have time to work.
10/08/2023
 I checked SG today:
- Chardonnel – 1.048
- Chambourcin – 1.062
- Chelois – 1.042
Note that I am looking at relative SG, so I only check one container of each varietal. Since all are below 1/3 depletion of sugar, I added nutrient:
- Chardonnel – 1 tsp DAP per batch
- Chambourcin – 2 tsp DAP, 1 tsp Fermax per batch
- Chelois – 2 tsp DAP, 1 tsp Fermax per batch
Note: DAP is DiAmmonium Phosphate. It’s generally not recommended for yeast as the yeast consume it too quickly, essentially providing the human equivalent of a sugar rush. I am slowly using up the package using small quantities in each batch.
Last year I ordered Fermax online and vendor sent DAP. I complained, they refunded my money and told me to keep the product. So I’m using it up as 20% to 30% of the nutrient for each batch. Waste not, want not!
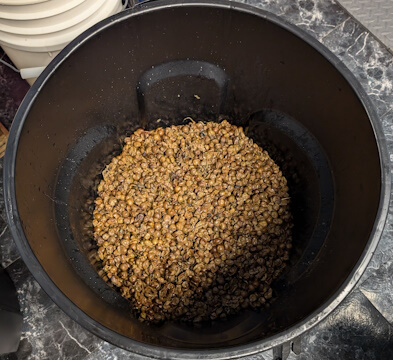
The wine in the test jar is Chambourcin – it’s got a very dark color, like last year.
The Chardonnel is looking good!
I took before and after photos of a Chelois bucket before punching down. This illustrates why I never fill a primary more than 3/4 full of grapes. The difference in height after punch down is significant.
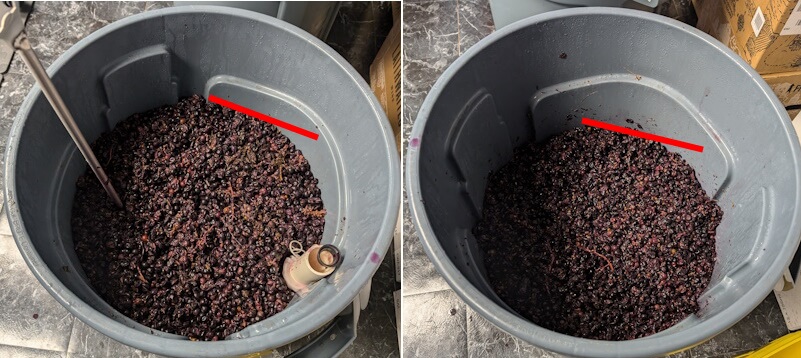
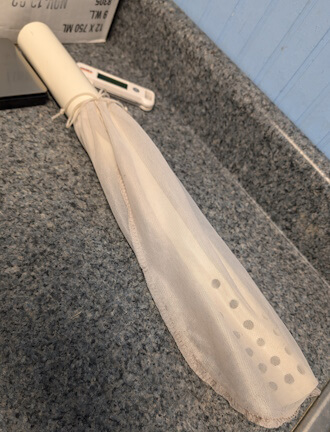
This also shows my racking jig in action. In the left photo (above) the jig is in the lower right corner with a FermTech wine thief inside it.
The next photo shows the jig with the mesh bag. I purchased the narrowest bag I could find that was tall enough. The larger the bag, the more there is to clean after use!
10/10/2024
New oak chips arrived late last night.
Added 6 more cups to Chambourcin and 4 more cups to Chelois, upping the total to 4 cups per fermenter.
10/13/2024
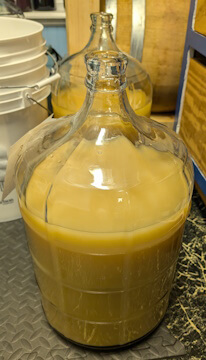
We pressed the Chardonnel today.
To avoid unnecessary labor, we first rack or pump the free run wine from the fermenters. We press on the concrete in front of the garage, and racking the wine from the fermenter saves carrying the wine up a flight of steps and through the house, then reversing the trip later.
We carry only the unpressed pomace.
Hard work pays off in the future. Laziness pays off immediately!
Since we used different yeast strains (Lalvin QA23 and Lalvin 71B) for the two batches, we racked each into a separate carboy. The wines will eventually be blended, but at this moment we kept them separate.
The amount of free run wine is a bit of a surprise – roughly 4 gallons from each fermenter.
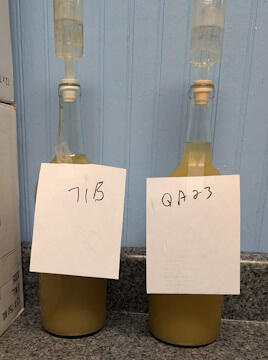 We checked SG and both are at 0.994. I was expecting this value, plus or minus a point. This is a heartier white, and it’s fermented on the skins, so I expected a slightly higher SG than lighter whites.
I hadn’t checked SG in several days as it didn’t matter. We planned to press today and I was certain the fermentation was complete.
A taste test of the raw wine showed that they taste very different. The 71B eats malic acid, and that one is definitely less acidic. The QA23 has a strong grapefruit taste.
We reserved 1.5 liters of each wine to use as a control. In a few weeks we’ll rack these bottles and will eventually bottle one 750 ml bottle of each.
The current plan is to bottle at about 6 months, and roughly 3 months after bottling the main batch we will contrast the 3 wines to see how they compare.
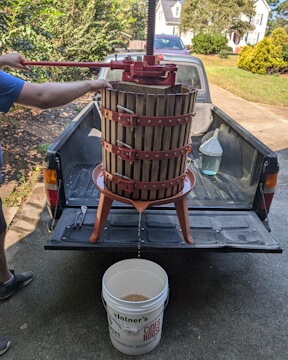
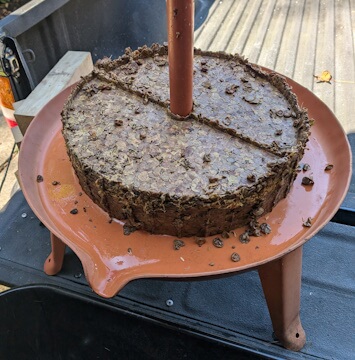
Pressing only 125 lbs of grapes went quickly.
We added rice hulls to help with extraction. Sprinkling rice hulls in layers in the must as we add it to the press makes conduits where wine can escape. I’ve noticed a significant increase in the amount of wine extracted when using rice hulls.
My hope was to get about 2.5 gallons more wine from the pomace, so that after volume loss due to sediment, we’ll net two 19 liter carboys of wine.
This was a real surprise, as we grossed about 3.5 gallons from the pomace.
We racked enough wine from the pressings to fill both carboys, then have nearly a full 4 liter jug in addition.
We’ll definitely get 2 full carboys, the two reserved bottles, plus probably one more.
It’s interesting how small the “cake” looks after pressing, with all the liquid removed.
10/14/2024
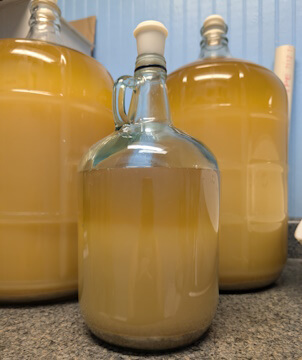
The Chardonnel started clearing immediately, which is expected since fermentation is complete. For a white wine, an SG of 0.994 is probably final.
It’s interesting to watch, as wine clears from the top down. The 4 liter jug looks about half clear, which is misleading. The gross lees (fruit solids) drops first, then fine lees (yeast hulls) will continue to drop for several months.
At this time I’m expecting to rack off the sediment in 2 or 3 weeks. An important goal is to limit the number of rackings.
Each racking exposes the wine to air.
Each racking causes a loss of volume of good wine.
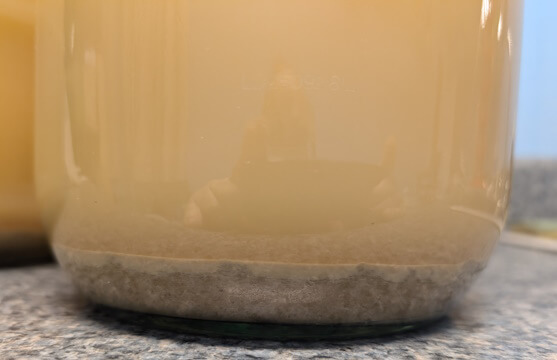
I typically do a “dirty” racking the first time, as the sediment dropped once so it will drop again. The point is to remove the gross lees without sacrificing too much good wine.
The next photo shows the gross lees that has dropped so far. I’m happy if this is a thin layer, as it means less volume loss to sediment.
My current expectation is to net about 11 gallons of wine.
10/18/2024
I purchased two 6 US gallon buckets of Pinot Noir. This will be fermented tomorrow with the pomace from the Chambourcin and Chelois.
10/19/2024
This section of the blog is a bit wordy and rambling. The blog itself is more flow of consciousness than directed. While this is me simply documenting activities, it may be useful to folks in understanding winemaking.
Pressing day for the Chambourcin and Chelois! My son’s girlfriend joined us for the festivities. I think we hooked her! She didn’t watch – she jumped in and actively helped.
She has a cider kit she hasn’t made yet. My son will be helping her with that. We have a convert!
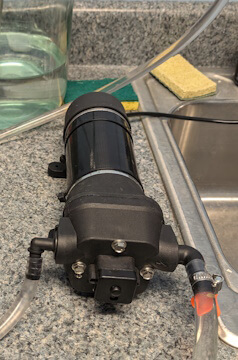
When working with typical kit sizes, e.g., 23 liters AKA 6 US gallon, simply racking the wine works great. But when working with larger batches, a pump truly cuts down on the labor. I purchased this pump a couple of years ago, and it was worth the money.
I considered the All in One Vacuum pump, but it didn’t work for all my use cases, so I went with this one. However, folks that purchased the AiO rave about it. It’s a bit pricy, but it’s on my radar, maybe for next year.
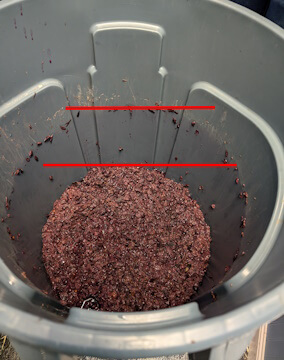
Last year we introduced a MAJOR labor saver into our process. We pump as much of the free run wine as possible from the primary fermenter before doing anything else.
As the photo shows, this can remove a LOT of wine.
Why is this a labor saver?
We have to carry the primary fermenter, containing roughly 140 to 150 lbs of grapes, from the cellar (door in the backyard) up to the front yard to press. By removing the free run wine, we avoid carrying that up front.
What happens is we pour the contents of the primary into the press. The free run wine runs through the press, and we have to carry it back down to the cellar.
I’m lazy in my old age – I see absolutely no point in carrying that wine twice when I don’t have to carry it at all! So we pump out the free run wine, carry only that which remains, and save unnecessary labor.
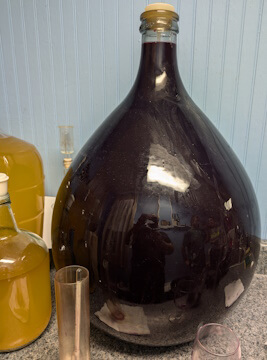
When I purchased my press in 2019 (found it on Craig’s List), it was a package deal – the press (currently retails for $960 USD), a 54 liter demijohn ($75), 25 liter demijohn ($60), plus other odds-n-ends including corks, capsules, etc. All for $275.
Used items can be good.
At that time I had NO idea what I’d do with the demijohns. The 25 liter is 6.6 US gallons, slightly larger than a 23 liter carboy but it takes up more space due to shape.
The 54 liter is huge, far bigger than any batches I’d made in decades. But it came with the package.
The following year I purchased my first barrel, 54 liters … and guess what? The large demijohn is perfect for settling out gross lees prior to filling the barrel.
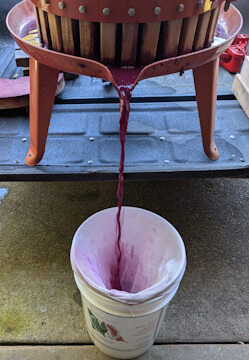
But it’s big-n-heavy – I fill it on the counter and it stays on the counter until I empty it. A few years back my son and I lifted it from the floor. We had a hard time keeping a grip on it, and nearly dropped it. That was the dumbest thing I have EVER done in winemaking, and the lesson was learned. I’ll pick up a full 19 or 23 liter carboy (I’m fairly strong and can do it easily, using good body mechanics), but anything heavier is not moved until empty.
I had to include the obligatory action shot of the press in action.
Except this is NOT in action. One of the press blocks is visible on the left. We simply poured the pomace, drained of as much free run wine as possible, into the press. What you see if more free run wine simply draining through the press.
Once we put the blocks on top, even more comes out. The relatively light weight of the wood pushes out a surprising amount of wine.
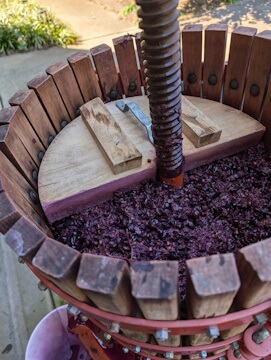
The next two pictures show just how much wine comes out of the pomace.
The first shot is the #40 press with 300 lbs of grapes in it. This fills it about 80% full. I figure I could add another 50 to 75 lbs of grapes and still not quite fill it.
For anyone making 200+ lbs of grapes in a single batch, I recommend the #40 press.
Note: For years I could not determine why the basket presses were named “#35”, “#40”, etc. The interior volume of each press did not progress in any type of rational fashion.
Finally I found a reference – the # indicates the interior diameter of the basket in cm. Mine is 40 cm in diameter, which is 15.7 inches, commonly rounded to 16 inches.
Ok, back to the before-n-after discussion.
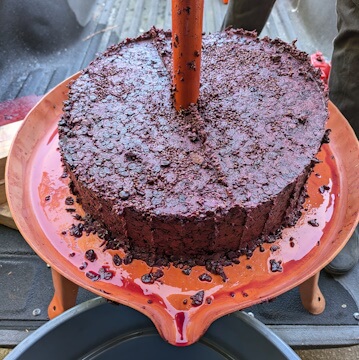
We pressed the Chelois “lightly”. This means we turned the ratchet of the press relatively lightly, so we were not cranking down on the grapes.
This was enough to compress the “cake” to what you see.
Note: The pomace of the Chambourcin and Chelois is being added to two 6 US gallon buckets of Pinot Noir. Red juice buckets typically make a light wine.
However, the pomace has a lot of “oomph” left in it, so fermenting the juice buckets with expended pomace really beefs up the juice!
I have made second run wines, adding water, sugar, acid, and tannin to make roughly an additional 50% of a lighter wine. Unfortunately, this produces inconsistent results.
Two years ago we used wine kits with pomace, which made a much better wine. Last year we used juice buckets, and while it’s not bottled yet, the wine is VERY nice.
This final shot for this section show how much the wine stains the wood!
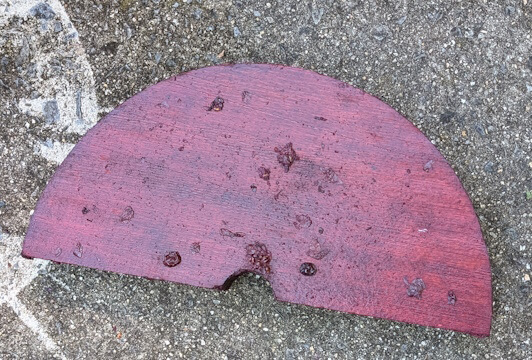
In summary, we pressed the Chambourcin and Chelois, grossing a LOT more wine than expected.
We also started the Pinot Noir juice buckets with the pomace. All we added was 4 tsp Fermax yeast nutrient to each batch.
Why? The pomace is full of very active yeast, so there is no point in adding more. It also has fermentation oak and was treated with Color Pro.
The Pinot Noir juice is apparently balanced at SG 1.090, and needs nothing more than nutrient. The wine remaining in the pomace is fully fermented.
10/20/2024
I met the vineyard owner half way to get the remainder of the grapes – 150 lbs of Vidal. A bit over 3 hours of driving, but it’s done!
The grapes are very cold so I’m not doing anything with them tonight, other than making a yeast starter with 2 packages of 71B.
I considered dumping them into a 32 gallon Brute tonight, since I’m going to ferment as a single batch, but after 3+ hours in the vehicle, I don’t have the energy for it.
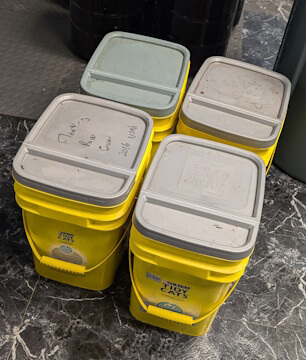
The packaging for the grapes is interesting – I was not aware that the plastic containers for clay-based kitty litter is commonly a food grade plastic. Any cat owners that buy litter in such packages – each holds about 40 lbs of grapes.
These are a LOT easier to move around. I was able to carry two at a time down into the cellar.
Side Note: If anyone is interested in French-American hybrids, ping me next August. I’ll put you in touch with the vineyard owner, as she may have grapes to sell. At that time she may have a good estimate for yields by varietal.
10/21/2024
Punched down the Pinot Noir in the morning and late morning. At the third (and final) punch down of the day I’ll add 2 tsp DAP to each fermenter.
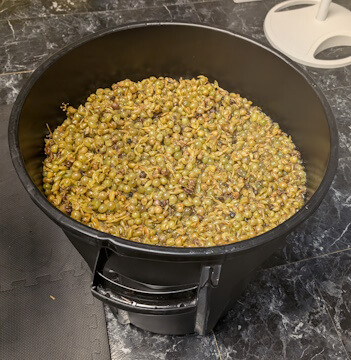
The temperature of the Vidal is up to 67 F, so we’re ready to rock! I’ve started fermentations as low as 58 F when starting a kit in the winter. In the fall the cellar temperature is typically 63 to 67 F.
Since I use maceration enzymes, I don’t need hot temperatures to extract color and tannin from reds, and fermenting cooler supposedly preserves aromatics.
I had a 20 gallon Brute handy, so I put 2 ml Cinn Free maceration enzyme in it, then poured the 4 buckets of grapes on top. Since Beth reported the SG at 1.062, I added 4 lbs sugar and stirred as best I could.
When chaptalizing, I check SG in 3 places around the rim of the fermenter. My readings were 1.082, 1.082, and 1.092.
Ok … it needs a LOT more stirring. So I stirred the must, scraping along the bottom from the sides to the middle, about twice as long as I stirred originally.
When checking the SG again, I got 1.088 from all 3 locations, so the must is mixed.
Next I made a starter with 3 Tbsp sugar, 1 tsp DAP, 1 cup water at 96 F, and 2 packets Lalvin 71B yeast. Within 5 minutes it was foaming well, so the yeast is viable.
I will wait about 6 hours, then add 6 tsp Fermax and inoculate. At that time I’ll also add the remainder of the Lalvin 31 MLB. What I have left is probably more than I need, but it doesn’t store well so I might as well use it.
Update: Added the yeast starter on one side of the fermenter, and Lalvin 31 MLB dissolved in 75 F water to the other side. Tomorrow afternoon I’ll do a punch down.
Note: As of 6 hours ago the wine was not fermenting. At this time the cap is riding high, so it is fermenting with indigenous yeast. However, the 71B will crowd out the original yeast and take over.
10/22/2024
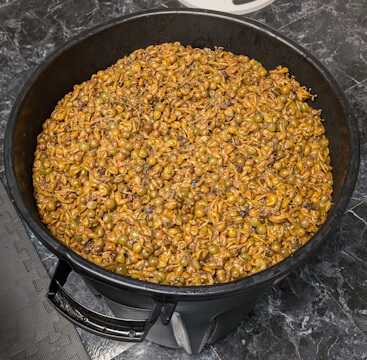
I did the first punch down at noon today. When I looked at the must it was clearly fermenting, as the cap was riding high, buoyed by CO2. Compare this photo with the last one to see the difference.
Normally I don’t fill a fermenter this full – my recommendation is no more than 3/4 full. A vigorous fermentation can produce a “boil over”, where the fruit particles gush over the side of the fermenter.
I’ve only had that happen once that I recall. In 2013 I juiced a bushel of apples to make apple wine. When done I had a LOT of glistening apple pulp, so I decided to make a second run wine from it.
It’s a simple recipe: for every 1 gallons of free run wine from the first run, add 1 gallon water, 2 lbs sugar, 1 tsp acid, 1/4 tsp tannin, and 1/2 tsp nutrient. It extends the amount of wine made by 50%, producing a lighter bodied wine that is drinkable sooner.
Fermentation took off great!
And boiled over that night, making a mess I had to clean up. Even worse, it boiled over again!
In this situation the apple pulp had a lot of volume for the weight, coupled with a vigorous ferment that produced a lot of CO2, made a mess. One I’ll avoid happening again.
Update:
In the evening my son & I bottled the 2023 Chambourcin, blending in 2023 Merlot for 10% of the total. That really made a difference in the depth of the wine.
Some things regarding the 2023 wines will be mixed into this post, as things overlap.
10/26/2024
Since we WAY over-produced this year, we have to clear space. We did this by bottling the 2023 Cabernet Sauvignon and Cabernet Franc that have been in barrel a year. Normally I let the new wine settle for 2 to 3 weeks, but we’re pressing the Pinot Noir and Vidal tomorrow, and the only open space are one each 12 and 19 liter carboys.
The details of bottling these two wines may be of interest.
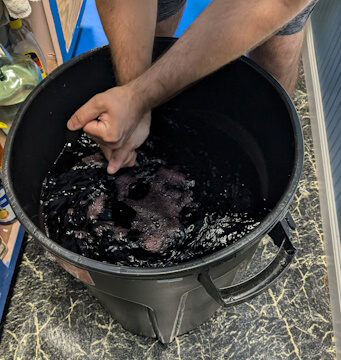 Over a year ago we planned to reproduce McGregor Winery’s Rob Roy Red, which is a Cabernet Franc-based wine. So we have CF and CS in barrel, and Merlot in glass. Our rough plan was 2 blends:
- CF 60%, CS 30%, Merlot 10%
- CS 60%, CF 30%, Merlot 10%
Today we racked all 3 wines, added K-meta and glycerin, and made samples at the above percentages. The plan was to taste the wines and decide if we needed to alter percentages, and make new samples.
Note: I use a 10 ml syringe to pull samples – 60 ml Cabernet Franc, 30 ml Cabernet Sauvignon, and 10 ml Merlot. It’s a LOT easier to work in metric when doing this.
Plan A failed badly. VERY badly. We hated both blends.
- The CS and Merlot were a distraction in the CF-based blend.
- The CF horribly overshadowed the CS in the CS-based blend.
Based upon our dislike of the CS-based blend, we decided to try a completely different CS-blend: 80% CS, 10% CF, 10% Merlot. We’d accent the CS with the other wines.
WOW! The two secondary wines shored up any deficiencies in the CS. We didn’t bother trying to fine tune it. Assuming we had 14 gallons of CS (it’s a 54 liter barrel) we added 1.5 gallons each of CF and Merlot, and bottled. Yes, we tasted the real blend, and it matched the sample.
Why didn’t we fine tune it? The opposite of “good” is not “bad”. It’s “better”. We loved the 80/10/10 blend and didn’t waste effort making it “better”.
The Cabernet Franc? We love it “as-is” and bottled it as a varietal. This is totally unplanned, but we went where our noses and tastebuds took us!
We have 4 gallons of Merlot, 1 gallon of remnants from the barrels (mixed CS + CF), and 5 gallons of a CS/Merlot (2 to 1 ratio). We’re probably going to Frankenwine that. [That means blend it and not worry about it.]
It occurred to me that non-winemakers can’t visualize 10 gallons of wine … and we’re just saying “well, it doesn’t matter, it’s just cooking wine if we don’t like it.”
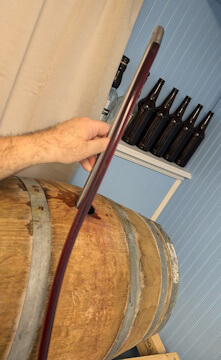
That was the 2023 wines. On to the 2024 wines!
We cleaned the barrels in preparation for the new wine. Normally use Barrel Oxyfresh to clean them, but I forgot to buy more, so we used a power washer to clean the barrels.
For each barrel I added 3 oz medium toast Hungarian oak cubes and 1 tsp K-meta. Then I started pumping Chambourcin into the barrel.
Only then did I remember that we have malolactic fermentation (MLF) underway, and malolactic bacteria doesn’t tolerate K-meta!
Oh, well, too late now. We have what we have, and hopefully the conversion of malic acid into lactic acid was well along.
This process drained the 54 liter demijohn of Chambourcin, plus another 4 liters.
I did the same for the Chelois, draining 19 and 23 liter carboys plus about 8 more liters.
This frees up space for the Pinot Noir and Vidal that will be pressed tomorrow.
10/27/2024

The first thing we did this morning was put labels on 1 case each of the Cabernet Sauvignon and Chambourcin. We had agreed on the labels so I finalized them.
Why the rush? Because I’m low on space, and this way my son can take some of his wine out of the way.
We each have our own logos, mine the “Grape Warrior” (look at the wine press on the shield), and his is a long sword wrapped in a grape vine. My wines have my logo, his have his, and our collaborations are bottled using both labels.

We had not decided on the Cabernet Franc label yet. The original plan (as described yesterday) was to produce a Cabernet Franc-based blend, but after taste testing we decided to bottle it as a varietal. There was a question if we’d continue to call it “Rob Roy Red” or if we’d called it “Cabernet Franc”.
My son likes the wines having distinct names, so we agreed to keep the planned name, and I added a note stating the wine is 100% Cabernet Franc.
The labels displayed here show the differences in our logos.
I have a page that displays all of our labels (mine going back 25+ years). It’s not updated as of this moment, but it will be shortly.
On to pressing!
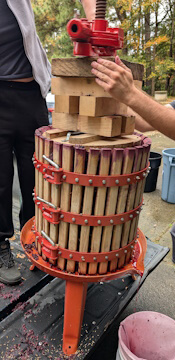
The setup on the press is enough effort that we minimize setup and take down. It’s not so much fun that we want to do it more then absolutely necessary.
The ratchet unit is cast iron and it’s heavy. Especially with the handle it is long enough that it cannot go below the top of the basket. So we put press blocks on top of the grapes, then stack other blocks on top of that.
At the top of the stack is a large squarish block with a hold in it. The ratchet goes on top of that. This block is scarred and gouged from contact with the ratchet, which is actually its purpose – it protects the other blocks and keeps them from being moved out of place by the ratchet.
Finally the ratchet goes on top, and it is spun around the spindle in the center of the press.
The picture shows the press when it is full right to the top.
Pressing the Vidal
First we use the pump to drain off as much of the wine as possible. There’s no point in simply pouring a lot of wine through the press. We have to carry it up from the cellar and then back down. By removing the wine before carrying it out of the cellar, we save a lot of effort.
This time we have 130 lbs of grapes, so the #40 press is less than half full. We used rice hulls between layers of grapes to improve extraction. The rice provides paths for the wine to drain out. The following picture shows the before-and-after of pressing the Vidal.
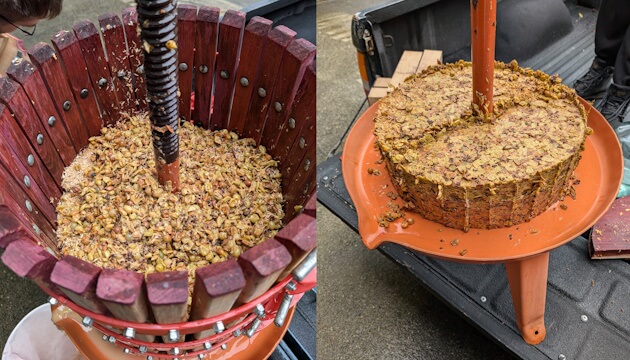
We pressed hard to get all the wine out. The last wine coming out can be harsh, but it also contains the most body and depth, so it’s a trade-off.
Pressing the Pinot Noir
The Pinot Noir is two 23 liter juice buckets. We fermented one with the Chambourcin pomace and the other with the Chelois pomace. Each batch was 300 lbs of grapes, so the must was very thick when compared to a normal must. We could have used less pomace, but we want the richest wine possible.
The pump didn’t work here, as the must is too thick to provide access to enough wine to pump. Instead we used a small food-grade bucket to scoop out the must and pour it through a straining bag. This separated out a fair amount of wine.
The remainder of both batches went into the press. It’s all going into a single wine (in one barrel), so to save effort we pressed it all at once.
We’ve pour some of the must in, smooth it, then scatter rice hulls on top. Repeat until all the must is in the press.
At the end my son and I had to manually press down a bit with the press blocks to make room in the press for the last of the pomace. This is the most full this press has ever been!
Then we pressed the heck out of it! The following photo shows the before-and-after.
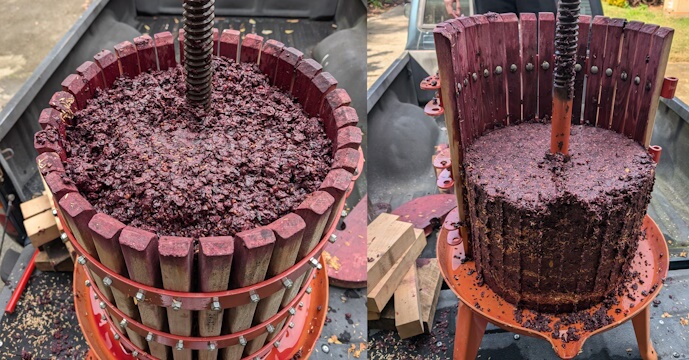
Our end result grossed 12 gallons of Vidal and 17 gallons of Pinot Noir.
After losses due to sediment, we’ll probably net about 11 gallons of Vidal. This is totally normal.
The Pinot Noir will also lose probably a gallon of volume due to sediment. However, this wine will go in a 54 liter barrel, and we’ll about 10% volume due to evaporation of water and alcohol through the wood. This is also normal, and it’s beneficial as the remaining wine is more concentrated.
10/28/2024
Today’s segment is a tangent, veering into hardware needs and accumulation.
I’ve been making wine for over 40 years, and during that time I’ve accumulated a lot of hardware. One of the least expensive but most necessary items is drilled stoppers and airlocks.
I soak mine in One Step solution periodically to clean them. The picture shows the ones that are not in use. Meaning I have more than what is shown, including vented bungs (require no water). I have stoppers to fit just about every contain imaginable.
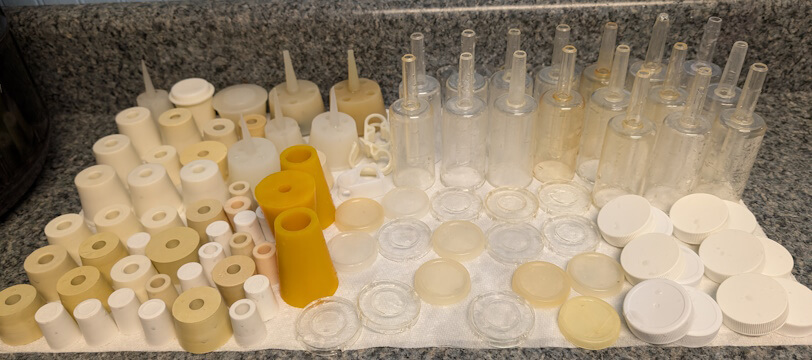
The time to buy airlocks and stoppers is before you need them!
11/10/2024
This is a LATE addition to this post. Today (01/16/2025) I realized I left the Pinot Noir barrel filling out!
In the morning I racked all the Pinot Noir into 6 gallon buckets for transport to my son’s house, adding 1/4 tsp K-meta to each bucket. He has the barrel, but we fermented everything in my cellar.
At his house, we drained the barrel of the 2023 Sangiovese. We bottled 7 cases, at which point we ran out of bottles. The remainder went into a bucket for transport, and once home I racked it into a 12 liter carboy. This was bottled on 12/22/2024.
We cleaned the barrel, then filled it with Pinot Noir. The yield after sediment loss was more than I expected. After filling the barrel we bottled five 750 ml bottles. My son will use that for topup for the next 5 months, then we will alternate Chambourcin and Chelois.
11/21/2024
Today I racked the whites.
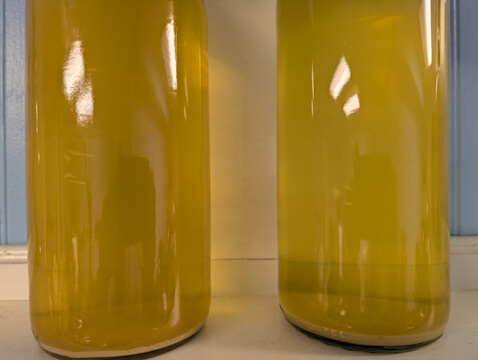
Chardonnel
The Chardonnel was in two 19 liter carboys and one 4 liter jug. In addition I segregated 1.5 liter bottles of the QA12 and 71B batches for later comparison.
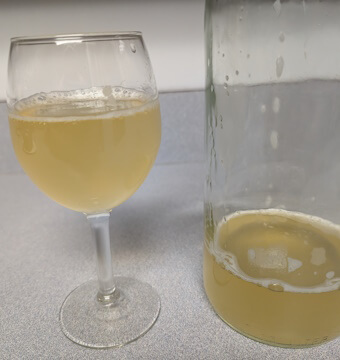
The QA23 is on the left, the 71B on the right. It’s hard to see in the picture, but the QA23 is slightly darker.
The carboys and jug were pumped into a 20 gallon Brute to homogenize, and to that I added 15.6 g FT Blanc Soft and 3/4 tsp K-meta.
The main batch is a surprise – the acid bite is MUCH reduced, so I surmise the MLF has completed. I received the chromatography yesterday and plan to use it over the weekend. to verify results.
I bottled one 750 ml bottle each of the QA23 and 71B batches, and added the remainder to the main batch.
The main batch went back into two 19 liter carboys, one 1.5 liter bottle, and one 750 ml bottle.
Vidal
The Vidal was in one 23 liter carboy, one 19 liter carboy, and one 4 liter jug. As with the Chardonnel, I pumped all three into a 20 gallon Brute to homogenize, and added 15.6 g FT Blanc Soft and 3/4 tsp K-meta.
Note that I add powders after the rack starts, and stir with a drill-mounted stirring rod after the rack is complete.
Friends rave about the addition of powdered tannin to stabilize the wine, improve mouthfeel, and add body. Plus longevity. So I took the plunge. The median dose of FT Blanc Soft is 16.2 g for 10 US gallons. I have a bit more wine than that, and split a nominal 30 g packet between the two batches.
The Vidal went back into the two carboys, plus another 750 ml bottle.
Note: The Vidal is slightly sharp, but far less than it was, and less than the 2023 was at bottling time. We slightly backsweetened the 2023 Vidal to balance the acid. I have hopes that enough tartaric will drop that we will not have to backsweeten this one.
When all was done I have about 3/4 of a 375 ml bottle of Chardonnel and a splash of Vidal leftover. Not enough to save yet good enough to drink!
12/12/2024
Once past that first racking, winemaking slows down to a glacial crawl. If wine is in a carboy, it’s only touched every 3 months. Wine in barrel is topped monthly.
Today is no exception, there’s no activity. However, there is something to see: the Vidal has dropped a lot of acid.
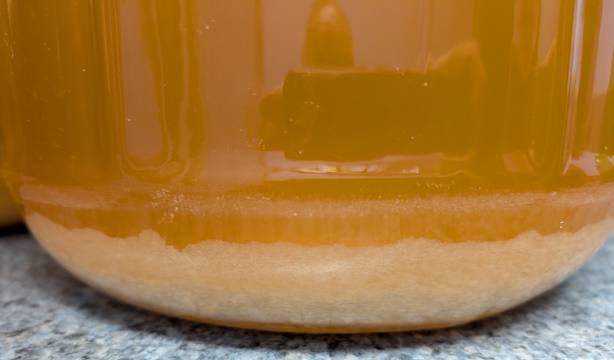
As previously noted, the acidic taste is much reduced – assuming the MLF completed, the transformation of malic acid to lactic acid is a large change in the wine’s character. But that has no effect upon tartaric acid. The remaining sharp taste was definitely tartaric.
However, if the amount of dissolved tartaric exceeds the acid saturation threshold, excess acid will precipitate as tartrate crystals. Vidal is known for doing this, and can be acidic enough to drop acid during fermentation. Additionally, it’s totally usual for Vidal to spontaneously drop acid post-fermentation.
Note: Cold stabilization is reducing the temperature of the wine to just above freezing, which causes even more acid to precipitate, as the lower temperature reduces the saturation threshold. This is a common technique for reducing acid in acidic wines, and it has the beneficial side effect of helping clear the wine.
Further Note: Not all wines need cold stabilization. It’s possible to remove too much acid, leaving the wine flabby.
My cellar is currently 59 F (15 C), which helps with acid precipitation. While a temperature at or just above freezing is ideal for this purpose, excess acid may be precipitated at any temperature.
It’s common to chill wine down to 50-55 F (10-13 C) for what is called “chill proofing”. Wines with higher acid that are refrigerated for more than a few days may drop acid crystals in the bottle. Chill proofing the wine helps prevent that.
ALL of my wines get chill proofed … because my cellar temperature is around 58 F in December and January, and that’s where I bulk age. If I need to cold stabilize a wine, I move it into 4 liter jugs which go into a small refrigerator for 2 to 3 weeks. This is not ideal, but it works.
Note: tartaric crystals are not harmful, but they are crunchy and feel like sand in the mouth. For that reason they should be avoided.
12/15/2024
Today we racked the extra carboys of Chelois and Chambourcin.
Chelois
We started with the Chelois, reserving tasting samples of each carboy. We didn’t fully homogenize the wine before, so the wines are slightly different, due to use of 2 different yeast strains.
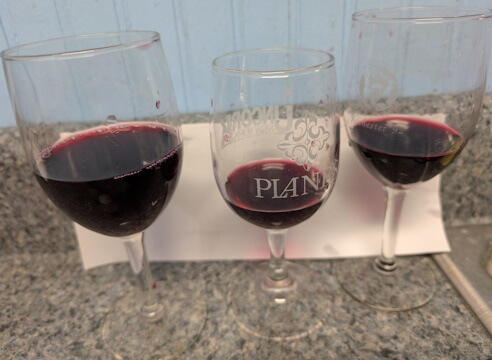
We always compare containers – the picture is (left to right) barrel, carboy 2, carboy 1.
All three wines are different – Carboy 1 is slightly acidic. Carboy 2 is more mellow. The barrel is concentrating because of evaporation and taking on oak character from the cubes, and it’s more acidic than either. Nothing to address today, but we’ll consider this in another 3 months.
The main point of today’s effort is the addition of finishing tannins. I have 3 different types, so different containers will receive each. We read the description of each tannin and decided which container would receive which tannin based upon that. We racked the wine back into 19 and 12 liter carboys, a 4 liter jug, plus three 750 ml wine bottles.
The dosages are based upon the vendor recommendations, going approximately with the median dosage (half way between minimum and maximum dosages).
- barrel: Quertanin Sweet, 2.1 g
- 19 liter carboy: Tannin Estate, 5.0 g
- 12 liter carboy: Tannin Riche Extra, 1.0 g
- remainder: no finishing tannins
The “remainder” is for barrel topping, and is the taste test control to see how all 3 tannins change the wine. The current plan is a taste test in March to see what the differences are.
According to vendor documents, the tannins take 6 weeks to integrate. At the February barrel topup the 2 carboys will be stirred to ensure they are homogeneous.
Finally we topped the barrel with 1.0 liters of wine.
Chambourcin
Next we racked the Chambourcin, which was in a 23 and a 19 liter carboys. Again, we have three different wines – all are more acidic than the Chelois, and the barrel most of all.
I screwed up when filling the barrels – I added K-meta, which kills MLB. So these did not fully go through MLF, whereas from taste the Chelois did.
The 23 liter carboy was acidic enough that we added 1 tsp potassium carbonate to the Brute to reduce the acid. I expect we’ll need a larger dose, but at the next tasting we’ll decide if the wine needs more or not.
Because we lacked another free 12 liter carboy, we racked back into a 23 liter carboy, three 4 liter jugs, and four wine bottles. We did not use the Tannin Riche Extra here.
- barrel: Quertanin Sweet, 2.1 g
- 23 liter carboy: Tannin Estate, 5.5 g
- remainder: no finishing tannins
We topped the barrel with 4.0 liters of wine.
Wow. We are trying to determine why it took so much. One possible reason is the top barrel tends to evaporate more. Another reason is that we may not have filled the barrel as much as it should have.
In any case, it’s full.
Later this week I will perform an acid chromatography on the wines to see how much malic was eaten by the MLB.
01/19/2025
This morning we did three things:
- topped the Chambourcin and Chelois barrels
- dosed one carboy each of the Chardonnel and Vidal with bentonite
- started an acid chromatography test on all wines.
Topping Barrels
This has become a standard thing – the only thing exciting is tasting the wine. Which is ALWAYS fun!
We stirred the barrels with a drill-mounted stirring rod to distribute oak character from the oak cubes prior to drawing a tasting sample.
The Chambourcin and Chelois barrels each took a a bit less than one 750 ml bottle each. We drew chromatography testing samples from the tasting samples – all that is needed is a drop.
Bentonite Test
The whites fermented on the skins are a bit hazy looking in the carboy, so we agreed to do a bentonite test. We have two carboys each of Chardonnel and Vidal, so the plan is to treat one carboy of each wine with 1 tsp bentonite. After a month we will compare the treated and untreated carboys.
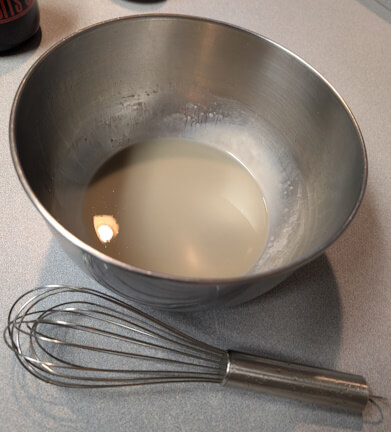
I used the method I documented last time I needed bentonite, to create a slurry with 2 tsp bentonite in 3/4 cup water. This made a looser solution than using 1/2 cup water, so it was easier to work with.
This time I used a whisk to stir the bentonite and more carefully poured the powder into 155 F water while whisking. After the mixture was blended, I covered it with a towel to retain heat. Following that, I whisked for about 30 seconds every 10 minutes, another five times.
When done there were maybe a dozen grains not dissolved. The slurry was very smooth, and I decided it was suffient.
We withdrew wine from the target carboys into sanitized containers, added the bentonite, stirred with a drill-mounted stirring rod to distribute the bentonite and stir the sediment back into suspension. Then we added the reserved wine back in.
Note: Since the Vidal is in a 23 liter carboy and the Chardonnel in a 19 liter carboy, we divided the bentonite solution unevenly, roughly 55% / 45%. It doesn’t need to be exact.
We pulled samples for chromatography testing from the tasting samples for the whites, then topped all carboys with a commercial Chardonnay. This amounted to about 3 oz per carboy.
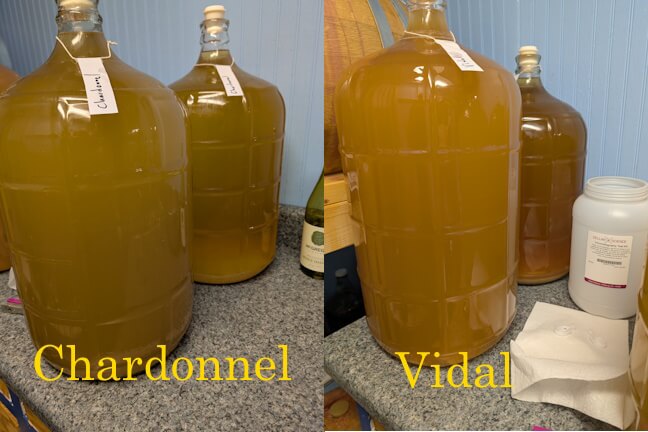
The carboys in front have bentonite, and were immediately cloudy due to the bentonite and stirred-up sediment. They were clearing within the hour.
The current plan is to let them rest until the next barrel topup in mid-February, then rack. We’ll taste test the treated and control wines at that time.
BTW – the Chardonnel is VERY nice, completely lacking in acid bite. The Vidal has a slight bite – next month we may choose to add a bit of potassium carbonate to reduce acid, although we might do what we did with the 2023, and backsweeten slightly.
If we backsweeten, we’ll need to buy lysosyme to kill the MLB, else it will react badly with sorbate.
Chromatography Test
Conducting a chromatography test is not difficult. I’m not going into too much detail in this post, as I’m also writing a detailed chromatography post, but will provide basic information.
First, create a test sheet – using a pencil, draw a line 1″ (2.5 cm) from the long edge of a chromatography test sheet. Then mark off points at least 1″ apart.
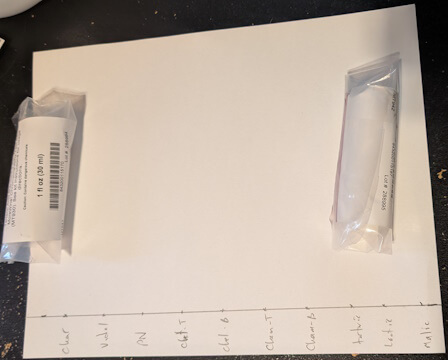
Then label the points with the name of the substance that will be tested at each point. In the sample above. Then put 1 drop of substance on each point using the pipettes included in the test kit.
In the sample above, the right-most three points are the test samples. The kit includes samples of malic, lactic, tartaric acid. More on that tomorrow.
For the other points we are testing the following:
- Chambourcin (B – barrel)
- Chambourcin (T – topup)
- Chelois (B – barrel)
- Chelois (T – topup)
- Pinot Noir (barrel)
- Chardonnel
- Vidal
We put a drop of wine on each point. Because I added K-meta early to the Chambourcin and Chelois barrels, we’re testing the topup for each to determine if there is a difference.
Using staples, form the test sheet into a cylinder. Pour 1/2″ solvent into the test jar, drop the test sheet in (sample side down), screw the lid on, and wait 24 hours.
01/20/2025
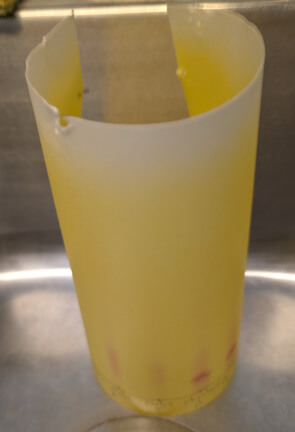
The solvent wicks up the test sheet, carrying the acids with it. Each acid stops at a specific point, based upon how the acid travels through the paper. More on this in a bit.
In the morning (about 21 hours after starting the test), I opened the test jar and removed the paper. It was yellow.
No markings, nothing other than reddish-purple where the red wines were added.
I was mystified. I knew I did the test correctly. It’s actually hard to screw up. Obviously I was missing something.
So I re-watched the video that explained things well. When I got to the part about reading the results, I realized the paper has to dry. As it dries the yellow turns green and the spots where the acid stopped become visible. Obviously I forgot that part, from when I watched the video in November.
Three or four hours later, the paper had dried enough to distinguish the spots. Eight hours after that, the yellow was almost all green and the spots were clearly visible.
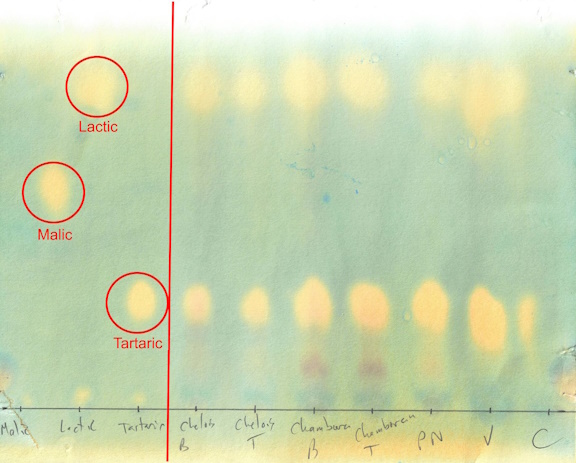
The circled spots on the left are the control samples of the three acids. The samples will ALWAYS produce spots the same points, and exist to help explain the other points.
Note: For the most part, I’ll not use the control samples in the future, as there is no need. I have scanned this test result sheet, and in the future if I’m not sure, I can use it to compare against future tests.
The test shows a lot of tartaric acid (more intense spots at the bottom), and a lesser amount of lactic acid (less intense spots at the top). There is no malic acid remaining (no spots in the middle), so the MLF ran to completion!!!
02/22/2025
Today is wine work day. I planned to rack the Chardonnel and Vidal that were treated with bentonite, but honestly, my cellar is freaking cold and I just wasn’t up to it! With the cold weather the cellar is 55 to 56 F (~13 C), which is good, as excess tartaric is dropping as tartrate crystals. Both topup bottles dropped crystals.
Chardonnel and Vidal
I examined the clarity of the Chardonnel and Vidal, fined vs. unfined. The carboys fined with bentonite are noticeably clearer. I didn’t take any photos, as I question if the difference will show in photos. So I taste tested – there is no difference in aroma or taste, which is what I expected.
It makes sense to fine the other carboys, for clarity alone. While we cannot taste clarity, we do feast with our eyes.
Chambourcin and Chelois
I opened bottles of topup wine for the Chambourcin and Chelois. When we corked them, in lieu of a label we wrote an “A” or “E” on the top of the cork with a Sharpie. This worked for identification.
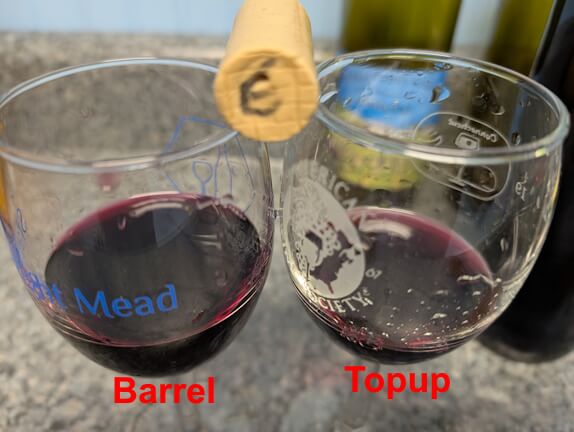
The Chelois barrel took 500 ml wine to top. It’s in an older barrel (manufactured 2010) and it’s on the bottom, so I note it requires less topup.
The barrel wine is slightly darker. The tannin is also slightly more pronounced, which is probably because the barrel was dosed with Quertanin Sweet finishing tannin, while the topup received nothing. The difference in tannin in not huge, but it makes the barrel a better wine.
The Chambourcin took almost the full 750 ml bottle, maybe an ounce remaining. This is not a surprise, as the top barrel in the rack always needs more wine. I suspect it’s a heat factor.
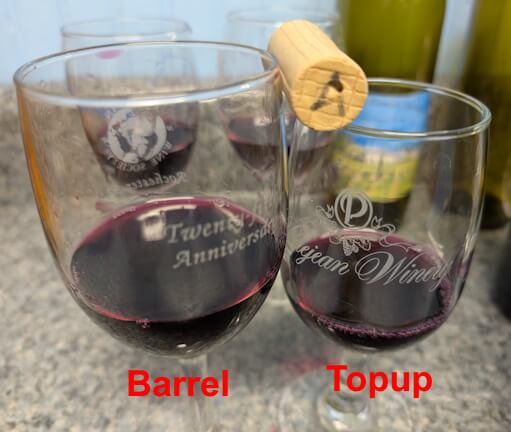
The color is pretty much identical, but the barrel is noticeably better. I can taste the tannin the middle of my tongue, just enough to be an improvement. I chalk that up to the Quertanin Sweet finishing tannin.
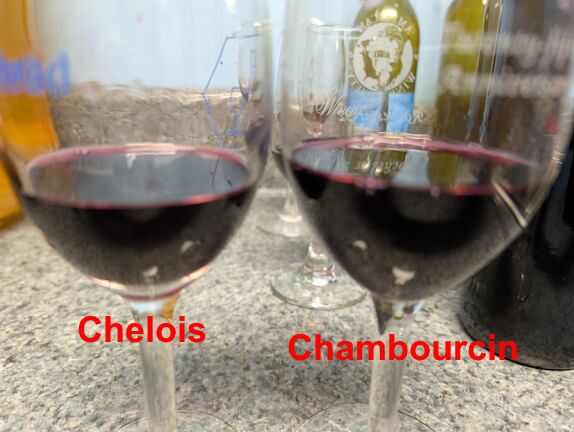
Then I compared the Chelois vs. Chambourcin. Color? Chambourcin is dark; the only wines I’ve made that are darker are wines overdosed with Color Pro. Keep in mind that Chambourcin is a Teinturier grape (red pulp & juice), so it will typically be darker than “normal” red grapes (white pulp & juice).
Look at the edges of the wines in the following photo. The Chelois is “red” while the Chambourcin is “purple”. No mistake, both wines have fantastic color, but the Chambourcin is the winner by a lot more than a nose.
Overall, I’m very happy with the progress.
03/23/2025
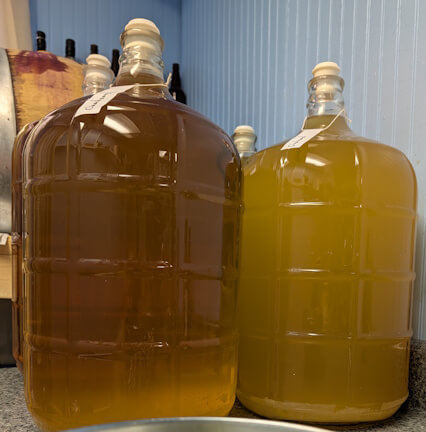
I finally got around to treating the second carboys of Chardonnel and Vidal with 1 tsp each bentonite, made into a slurry. As with the previous bentonite treatment, I withdrew wine from each carboy into a sanitized container, divided the slurry between the 2 carboys, then stirred gently with a drill-mounted stirring rod. This stirred up the sediment, which is not a problem – it dropped once, it will drop again. Then I topped with the reserved wine.
The photo shows the previously treated carboy of Chardonnel on the left, and the newly treated carboy on the right. The orange hue is a good indication that the wine was fermented on the skins. In the glass, it looks far more normal.
The right carboy is cloudy due to the bentonite and having the sediment stirred up.
Having a bit of wine left over, I HAD to taste test.
Taste testing the extra was interesting. I tried the Chardonnel first – the aroma reminds me of Chardonnay, which may make sense, as the parents of Chardonnel are Chardonnay and Seyval.
The taste? It was bland and flabby. My first thought was I’d need to add tartaric acid. Then a second taste was TOTALLY different. Much brighter.
Then I tasted the Vidal. Same exact situation – the first taste was “meh”, but the second was bright and vibrant.
It’s interesting that I had the same result from both tastings. I’m wondering if the cause is “me”.
The wines are young (5 months) so I don’t expect a lot at this time. However, I do expect that adding glycerin at bottling time will make an improvement. We’ll see.
07/02/2025
I cannot find my notes for barrel topup. Once I do, I’ll update this post. Generally speaking, each barrel requires about 750 ml of topup each month.
My niece and her family are visiting, so it’s a good time to bottle the whites.
Vidal
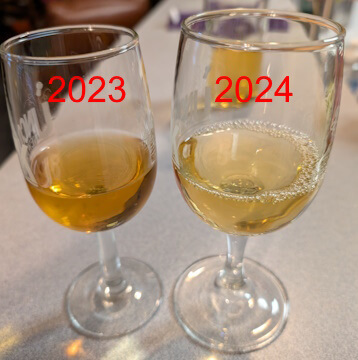
This one is bone dry, and between the MLF and cold stabilization over the winter, the acid is in a good range. It’s totally different from the 2023 Vidal. The 2023 is higher in acid and required light backsweetening to balance the acid, and it’s darker in color.
The color difference between the two vintages is clearly visible in the side picture.
Both wines are “orange” wines, fermented on the skins, I attribute the 2023’s color to the fermentation conditions. In Fall 2023, we drained 4 US gallons of juice from the crushed Vidal, which was fermented as a typical white (juice only).
This means the remaining Vidal was fermented with a higher ratio of pulp-to-juice, so there was more skin to extract color from.
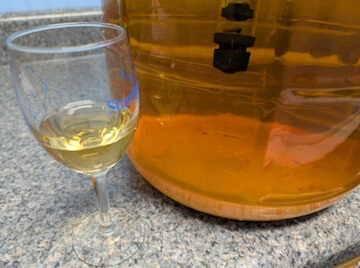
The 2024 had FT Blanc Soft finishing tannin added, which added body and fullness of mouthfeel. We’ll use it again next year. See below in the Chardonnel for thoughts regarding this additive.
We added 14 oz glycerin, about 1.25 oz per 1 US gallon of wine, which smoothed the wine and added more mouthfeel.
Due to the MLF, all malic acid in the 2024 was transformed to milder malic acid, which gives it a milder taste, but is very good. The 2023 Vidal has a bit of apple in the taste, due to malic acid (dominant acid in apples).
And while the color is lighter in the 2024, it’s definitely and “orange” wine. The side graphic shows the wine in the glass versus the carboy. The carboy appears darker because the wine is deeper, so the color is more obvious.
We netted 55 bottles of wine.
Chardonnel
We bottled the Chardonnel as well, netting 52.5 bottles. This one also received the finishing tannin, and we added 12 oz glycerin, which is 1.15 oz/1 US gallon. The wine is rather smooth and somewhat resembles Chardonnay. It will be interesting to see what it tastes like in 3 months.
The color in the carboy is a bit lighter than the Vidal.
This wine was fermented in 2 batches with QA23 and 71B. Post pressing we reserved one 750 ml bottle of each batch (in corked bottles) and blended the remainder. Post bottling we opened both reserved bottles plus a half bottle of the finished wine. The taste test results are interesting.
QA23: This wine has nice honey notes, very distinct. Even young it’s very good.
Finished wine: The honey notes are stronger than the QA23, and it’s a lot smoother due to glycerin. I’m really happy I have 2 cases of it.
71B: This one has strong honey notes, which is why the finished wine has stronger flavoring than the QA23. It’s good enough I wish I had cases of it, instead of the one bottle.
Next fall I want to make Chardonnel again, using the same method, but will use only 71B.
07/15/2025
We are almost out of barrel topup, so I racked three 4 liter jugs of Chambourcin. From that I refilled two jugs and five 750 ml bottles. Those bottles plus three bottles of Chelois will take us most of the way to bottling time. When necessary we’ll broach another 4 liter jug.
Of course I tasted the Chambourcin, and while it has good nose, the taste is meh. Not bad, just not interesting.
In contrast, both the Chambourcin and Chelois barrels are quite good, even as young as they are.
It came to me later, after reviewing my notes, that the barrels and carboys received various finishing tannin, the jugs did not. The jugs are a “control” for the experiment. The wines that received finishing tannin are better.
This is a selling point for the finishing tannin, as it improves both flavor and mouthfeel.
10/02/2025
I have been lousy at updating at each monthly barrel topup, which this year has been about every 6 weeks. This information is useful as it helps me predict how much topup I’ll need at various points in the year. Topup amount varies depending on ambient temperature and humidity.
The “every 6 weeks” came about as that’s roughly when one 750 ml bottle of topup is required. At the 4 week mark, it’s often less, meaning I have to figure out what to do with the excess wine.
I’ve been storing topup in 750 ml bottles, typically sherry or port bottles with T-top stoppers as it’s efficient.
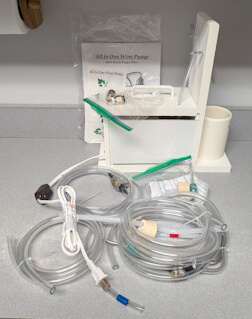
I received the All In One Wine Pump (AiO) yesterday. I purchased with Professional model, which has an upgraded pump for longer running. I probably won’t need it, but since we bottle up to 25 gallons at a time (15 is more common), it made sense to spend a few extra dollars to get a better unit.
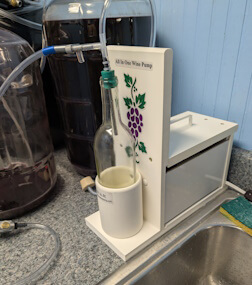
I also purchased the stainless steel upgrade and the stainless steel bottle filler. Again, it makes sense to spend a few extra dollars now and ensure I have what I will need (or want).
Setup is easy, but I was being a bit dense and the instructions didn’t make immediate sense. So I opened YouTube, found a setup video, and realized I was being dense. Once I considered how the system works, it all made sense.
Anyway, I used it to rack the 23 liter carboy of Chambourcin and the 19 and 12 liter carboys of Chelois.
WOW! That is easy! As noted elsewhere, the AiO will not handle all my uses cases, but anything involving pumping into a carboy works great!
Added a scant 1/4 tsp to the 23 and 19 liter carboys, and about half that to the 12 liter.
10/04/2025
Today we bottled the Pinot Noir. My son is moving, and the barrel needs to be empty for that. Today is a good day for this to happen.
For racking the barrel, we used the transfer pump. There was a significant leak in the output connection, but we made it work.
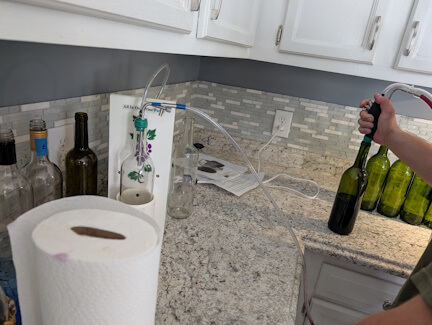
Tasting the wine, it was unexpectedly a bit harsh. We added 20 oz glycerin and that made a HUGE difference. Glycerin really smooths a wine.
The final dose of K-meta is 1/2 tsp. We could add as much as 3/4 tsp, but my younger son is sensitive to K-meta. He is NOT allergic, but he can smell K-meta at concentrations lower than anyone I know. The dosage added is sufficient to protect a wine that will probably be consumed with in 5 years.
For bottling, we made the maiden voyage of the AiO. This was initially more difficult than anticipated — all user error.
Setup was easy, the connectors are color coded and with understanding of how the system works, I quickly figured it out without referring to the instructions.
Then comes the “user error”. There is a release valve in the line — push the button and the vacuum stops and the wine stops flowing. However, I treated the button the opposite, thinking I needed to push it to fill the bottle. My reaction is understandable, as I couldn’t stop the filling!
Once my confusion was solved, next job was adjusting the vacuum. For racking, running the unit at full speed makes sense as it gets the job done quicker. For bottling? Fast pumping produces foam in the bottle, which requires more effort to properly top the bottles. It took half a dozen bottles to get the setting “just right”.
Once we had things figured out, filling 6 cases took about 35 minutes. This is by far the fastest bottling we have ever done.
It helped there was 4 of us — Anastasia was the bottle setter, she lined up bottles for filling. Eric, Patrick, and I took turns doing the filling. Eric & I traded off on handing off full bottles to the corker, and Eric & Patrick traded off on corking. We were very efficient. If it was just 2 people, we’d have been nearly as fast, but it would have felt more rushed.
We all agreed that bottling with a gravity filler tubes is off the table. This was so much easier, faster — AND less messy. We always over fill a few bottles with the filler tube.
As an aside, it’s useful to have a light behind the bottle, to make seeing the wine level easier. A few weeks ago I purchased a 1,000 lumen LED light on a stand. We will use that for bottling in my cellar.

Very cool stuff and love the pictures. I’m able to get my mind wrapped around the scope and volume of wine being made. I’m impressed with your starting SG not being over 1.100.
Outstanding documentation of the process. I look forward to continuing updates.