
How to Make a Yeast Starter
updated 05/01/2025
Standard instructions for wine yeast say to sprinkle on top of the must, and possibly to stir it in. This works, but the fermentation may not actually occur for 24 to 72 hours. The longer the yeast takes to establish itself, the more time there is for a wild yeast or other microorganism to take root. Even if the desired yeast crowds out the contenders, it’s possible to produce off-aromas and off-flavors. Also, if the must has difficult growing conditions, such as very high brix or low pH, a larger colony is more likely to survive and prosper.
Plus — let’s be honest — the longer it takes for fermentation to ignite, the more nervous the winemaker is.
 The solution is to make a yeast starter, letting the yeast reproduce in a controlled, more ideal environment. This not only proves the yeast is viable (an old or badly stored packet may not be), but produces an initial yeast colony that is larger and more able to quickly establish itself in a must.
The credit for this process belongs to Matteo Lahm, owner of Finer Wine Kits, which is distributed by Label Peelers. The FWK instructions describe how to make a yeast starter and state it should process for 18 to 24 hours before inoculating. My instructions build upon and refine the FWK instructions, based upon my personal experiences.
The starter requires 5 ingredients:
- empty, sanitized wine bottle or similar container
- wine yeast packet
- 1 cup potable water (tap water if not heavily chlorinated, spring, distilled, etc.)
- 1/2 tsp yeast nutrient, such as Fermax or GoFerm
- 4 to 4.5 Tbsp white sugar [I’ve upgraded the amount a lot as FWK uses a lot more]
Sugar Calculation
A while back a discussion was conducted on WMT regarding how much sugar to add for the starter. Too little and the yeast runs out of food prior to inoculation. Too much, and as Ohio Bob pointed out, too much sugar may produce too much osmotic pressure on the yeast and inhibit reproduction.
I intended to measure the SG of varying amounts of sugar in starters at my next batch, which will be Oct 2024. However, in July Wineview measured a FWK Packet B (for yeast starter) and reported 55 g. That gave me the idea to simply calculate the SG based upon the amount of sugar. Reality will differ a bit from the calculations, but should be close enough for our purposes.
Note: FWK include 3 packets, A, B, and C.
A: yeast nutrient added when the kit is reconstituted.
B: nutrient used for the yeast starter. This is the one referenced above.
C: additional yeast nutrient added during fermentation when 1/3 of the sugar is eaten, e.g., if the OG was 1.090, 1/3 depletion is roughly SG 1.060.
I determined the amount of sugar to use with the following calculations. Note that it is NOT necessary to understand these calculations to make a starter. My method is added in case anyone is interested.
- Using an online converter, 55 g = 1.94 oz of sugar.
- Since 16 oz sugar in 1 US gallon produces SG 1.045, 1 oz in 1 cup water produces the same SG (8 oz is 1/16 of 128).
- Multiplying 1.045 by 1.94, that 1 oz sugar should produce SG 1.087. [If we assume some nutrient in the FWK Packet B the SG is probably above 1.080]
- Using another online converter, 2 oz sugar = 4.5 Tbsp.
- Rounding down to 4 Tbsp for a starter produces SG 1.078.
- Allowing various inaccuracies, using 4 to 4.5 Tbsp sugar in 1 US cup of water produces a satisfactory SG that will keep the yeast alive for 12 to 24 hours that a starter will work prior to inoculation.
Instructions
1. If the yeast is refrigerated, set it on a room temperature counter for an hour to let it come up to temperature. Put the bottle on the counter as well, especially if stored in a cold cellar. Room temperature is assumed to be between 68 and 80 F (20 to 27 C).
Why? To avoid temperature shock as much as possible.
2. Warm the water to 90 to 100 F (32 to 38 C). I typically target 95 F.
Why? This is a more ideal temperature for the yeast, even if it’s too warm for wine. The starter will cool to the temperature of the must before inoculation. I have seen instructions saying to use 104 F (40 C) water, but I’m not sure all wine yeast strains can live in water that hot, and I know that 90-100 F works.
3. Place the yeast, nutrient, and sugar in the bottle. Add the warm water and swirl to mix. Loosely cover the top to keep “things” out, but do not seal tightly.
Note: I’ve been increasing the amount of sugar I add, as the yeast consumes it fairly quickly. In a 19+ liter batch, the extra alcohol from this is trivial. Even if making a starter for a 4 liter batch, the amount of alcohol produced is trivial.
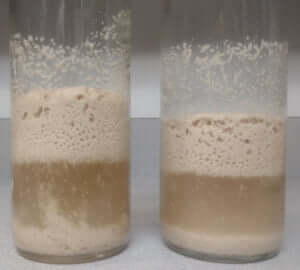
4. Let the bottle remain undisturbed on the counter for 2 to 8 hours. It should foam up within 30 minutes, and the water may churn with activity.
Why? This provides a stable environment in which the yeast rehydrates and starts multiplying.
5. Move the bottle to the area the must is located in. Rest it there at least 4 hours, with a minimum total time of 4 hours, and up to 24 hours. I typically create the starter around 6PM, move it to the winemaking area around 10PM, and inoculate between 7 and 8 AM the following morning, so the starter has 12 to 14 hours to work.
Why? This lets the starter match the temperature of the must, so there is less shock when it is added to the must. The longer the starter is allowed to work, the larger the initial colony is and the faster it will grow.
6. Swirl the bottle to mix the contents. Carefully pour the starter down the inside of the fermenter so that it spreads as little as possible. If the fermenter has inward sloping sides and pouring down the side is difficult, pour gently into the middle of the must so the starter spreads as little as possible.
Why? Because the yeast will establish itself in the must better if it’s not spread out.
7. Cover the fermenter with a towel. I typically see fermentation take off within 24 hours, although in some situations it may take up to 48 hours.
Generally speaking, I can smell fermentation within 6 hours, even if there is no visible sign of activity.
Note: It’s important to use a correct amount of yeast for the batch size. The typical 5 to 6 g packet is good for batches of 4 to 23 liters. Using more yeast causes no harm and may cause the fermentation to proceed at a more rapid rate, but there are diminishing returns beyond which adding more yeast provides no additional benefit. I use the vendor’s recommendation for the amount to use.
In the last couple of years I buy yeast in bulk and measured several strains, to determine the volume (teaspoons) of yeast in 5 g. For the strains I measured, this is 2-1/4 to 2-1/2 tsp. While I could measure the yeast on a scale, adding 2-1/2 tsp yeast to the starter ensures I have a good starting amount, so getting out the scale is just a waste of time.
Note: There is a room for variation here — in rare circumstances I’ve used starters that were 4 hours old, and they worked, although I’ve noted the overnight (12+ hours) starters kick in faster, which makes sense.
The yeast starter container should be uncovered for 8 hours, right?
Cover the bottle loosely to keep “stuff” out.
Note: I just published an update with more details, addressing your question, plus making other points that may help.
I would think that the glass of the mixing bottle would drop the temperature of the water when you add it quite quickly. It might defeat the purpose of warming the water to 95 degrees. I guess if you really wanted that temperature to start the yeast, you could warm the bottle in a water bath before the initial mixture.
That said, it works the way you do it, so why change it?
I have been warming my water in a metal cup on the stove, and inoculating the yeast into that.
The bottles are typically in my kitchen for at least a few hours beforehand, where the temperature is 68-72 F depending on time of year. While I agree the bottle reduces the temperature of the water a bit, I have doubts that it’s a lot. Next time I make a starter I’ll check the water temperature 5 minutes after putting it in the bottle.
If the temperature drops to 90 F, it doesn’t appear to matter, as I get a vigorous starter every time.
There’s a thread currently going on WMT where folks are posting their starter methods, all of which work. I suspect that it doesn’t really matter which method is used, as all methods posted are reported to produce good results.
You got me thinking — next starter I think I’ll check the temperature every 30 minutes. Since it’s only 1 cup water, I suspect that the temperature reduces to room temperature faster than anyone might expect.
Yes I am following that thread as well. I just keep it in the sun in the cup metal cup I start it in. It probably is best ultimately if it drops to the temperature of the must before you add it. Fun discussion. Thanks so much for sharing your knowledge!